4.1 How to Start - Hello World
Let’s start with a simple Hello World example to see OLIVE connectivity in action.
This hands-on scenario demonstrates the fundamental building blocks of OLIVE connectivity.
Do not worry if some concepts are not fully clear at first, they will be revisited and explained in more detail throughout this chapter and the following ones.
Instead of introducing all concepts at once, we will build up the Hello World example incrementally:
- Start with one single datapoint
- Invoke the datapoint manually using an API tool
- Understand the structure of a datapoint
- Add a second datapoint and call both manually
- Introduce a connector to automate orchestration
- Apply the full Hello World scenario (page fetch + AI summary)
This mirrors how connectivity is typically developed in practice.
Hello World – Step 1: Create and Execute one Datapoint only
Before creating our first datapoint, we need to understand its basic structure and role in OLIVE connectivity.
This step deliberately focuses on one datapoint in isolation, without orchestration or automation.
Datapoint Concept
In OLIVE, a Datapoint is the smallest executable unit of connectivity.
Conceptually, a datapoint defines what should be executed, but not when or in which sequence.
Execution timing and orchestration are handled later by connectors.
Datapoints are:
- Declarative definitions
- Passive until invoked
- Reusable across multiple connectors and scenarios
A more detailed conceptual explanation can be found in the Datapoints documentation Datapoints
Datapoint Structure
A datapoint in OLIVE always follows the same basic structure.
{
  "id": "example-datapoint",
  "type": "datapoint",
  "version": "0.0.1",

  "datapoint": {
    "type": "http",

    "http": {
    }
  }
}
The three layers in that skeleton are:
| Part | Where | What it carries |
|---|---|---|
| Basic attributes | the outer object | id, type, version, and optionally name, tags, description |
| Datapoint specialization | datapoint.type | which kind of datapoint this is — here http |
| Properties | datapoint.http | the type-specific configuration: url, method, headers, body |
From a metamodel perspective, every datapoint consists of three conceptual parts:
- Datapoint Specialization
The type attribute classifies the datapoint into a concrete specialization.
-
- Examples of datapoint types include: HTTP, Transform, Prompt, Agent
In this first Hello World step, we use an HTTP datapoint.
For a deeper explanation of the OLIVE metamodel layers and their relationships, see the Metamodel documentation DataPoint
- Basic Attributes
The basic attributes contains metadata used for identification and documentation:
-
idnameversiontagsdescription
This information uniquely identifies the datapoint and makes it discoverable in the OLIVE tooling.
- Properties
The properties define what the datapoint does.
For an HTTP datapoint, this typically includes:
-
- Target URL
- HTTP method
- Optional headers
- Optional body
The properties are specific to the concrete datapoint type.
Creating the Hello World Datapoint
The simplest possible Hello World scenario: "Call a public REST endpoint and return its response."
At this stage:
- No connector
- No authentication
- No AI
The goal is to understand how a datapoint is defined and executed on its own, without any orchestration or additional concepts.
The following example shows a minimal HTTP datapoint that performs a single GET request.
{
  "id": "helloworld-dp-http-get",
  "type": "datapoint",
  "version": "0.0.1",
  "name": "helloworld-dp-http-get",
  "displayName": "helloworld-dp-http-get",
  "tags": [
    "example",
    "simple-example",
    "scenario-helloworld",
    "scenario-example-helloworld"
  ],
  "description": "Minimal Hello World datapoint performing an HTTP GET request",
  "datapoint": {
    "type": "http",
    "http": {
      "url": "https://api.restful-api.dev/objects/1",
      "method": "GET"
    }
  }
}
This datapoint:
- Defines exactly one HTTP request
- Does not rely on any external input
- Can be executed independently
After defining the contents of the datapoint, the datapoint must be registered in the OLIVE Connectivity Editor before it can be executed.
To configure connectable elements in OLIVE, you will use the connectivity editor, which is part of every OLIVE installation. The connectivity editor can be accessed in your browser through the following URL:
https://repo.<tenant>.<cluster>.<domain>
When you open this address, you will see the connectivity editor of your tenant.
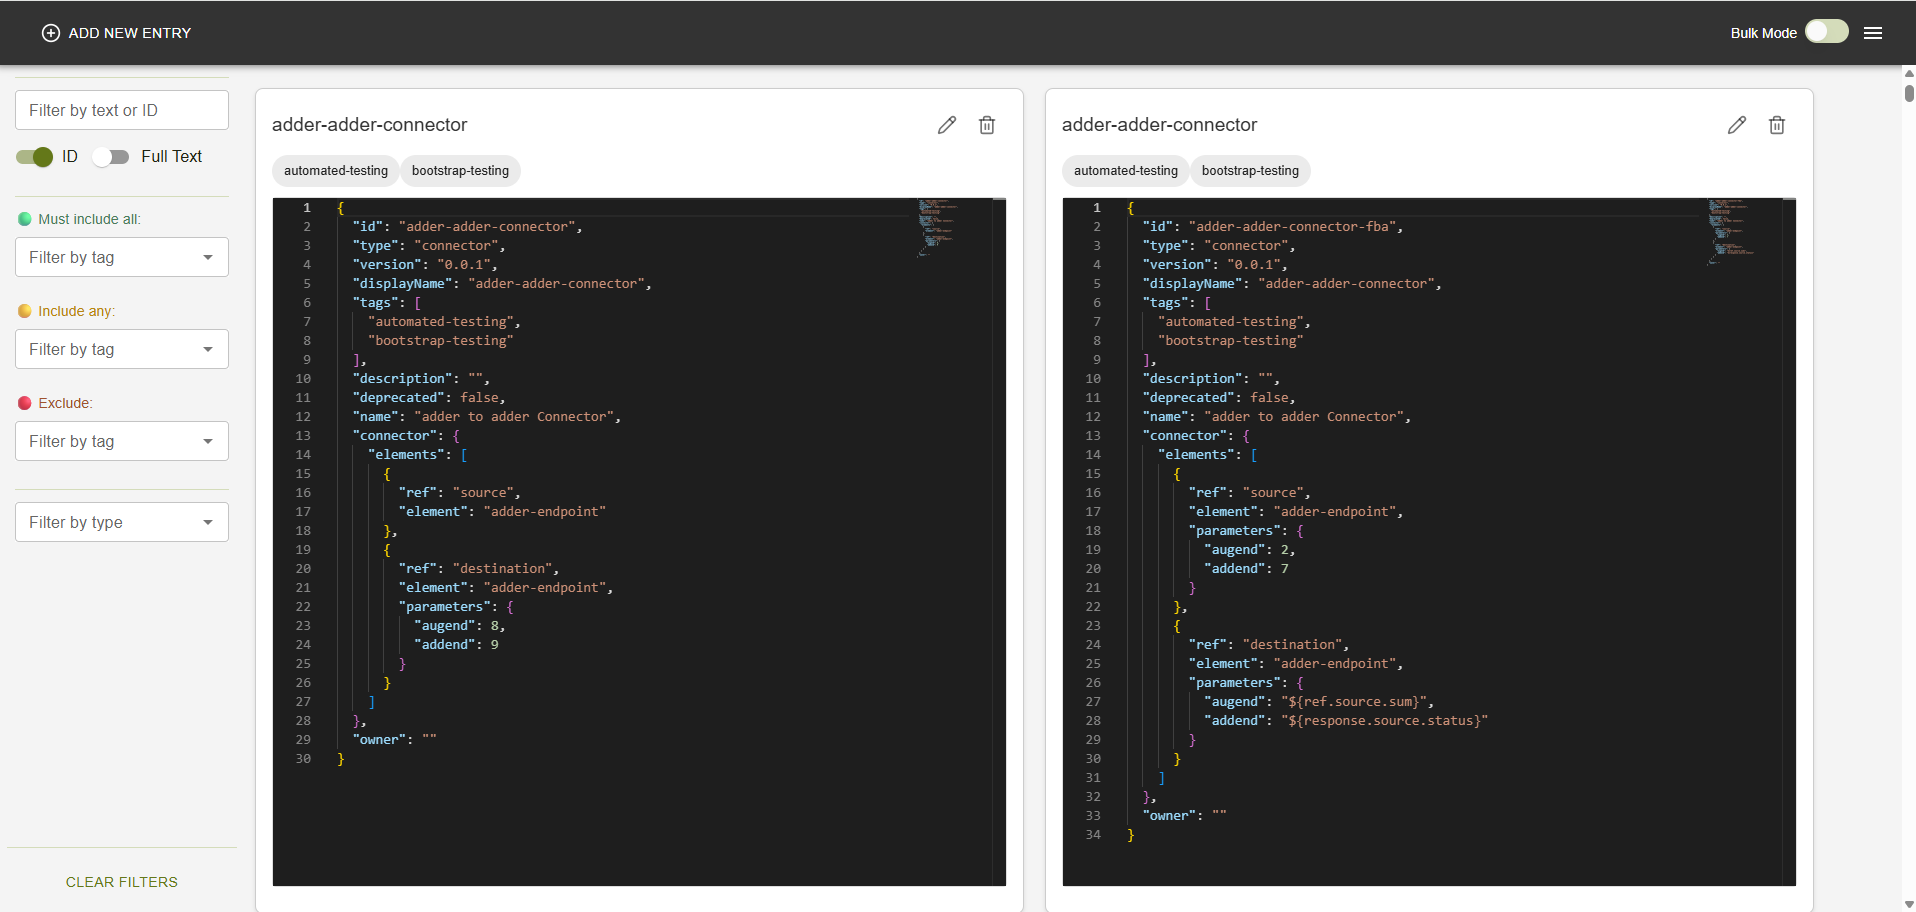
This is the main entry point for working with connectable elements.
Within the connectivity editor, you can:
- Create new connectable elements
- View and edit existing elements
- Delete entries that are no longer needed
- Filter and search across the repository, which is particularly helpful when working with larger collections of elements
Simply copy this JSON structure of the datapoint above and paste it at "Add new Service" in the connectivity editor.

You don’t need to make any changes to the JSON.
Testing OLIVE Connectivity with an API Tool
After creating your first connectable elements, the next step is to test them to make sure they work correctly. Since OLIVE connectivity runs without a user interface or micro-frontend, testing requires the use of an external API testing tool.
Our recommended tool is Bruno. Bruno is open-source, lightweight, and designed for quick and easy API testing. It allows you to send HTTP requests with different configurations and review the responses, making it ideal for validating OLIVE's connectable elements.
That said, you are free to use any API testing tool of your choice. Alternatives include Postman, Insomnia, Hoppscotch, and others. The only requirement is that the tool must be able to:
- Send HTTP requests with different methods and parameters
- Display the returned responses in a readable way
Before continuing, please ensure you have Bruno (or your chosen tool) installed and open, as you will need it for the upcoming steps.
Calling the Hello World Datapoint via Bruno
Before orchestrating multiple steps, each datapoint should be tested individually. To perform the test, we call the OLIVE data orchestration service and the datapoint id we want to invoke.
Invoke the OLIVE data orchestration using the following datapoint (replace <tenant>.<cluster>.<domain> with your actual tenant domain):
https://api.<tenant>.<cluster>.<domain>/data-orchestrator/v1/invoke
Request Details
- Request type:
POST - Request body: JSON format
The request body only needs the id of our just created Hello World datapoint.
{
  "id": "helloworld-dp-http-get"
}
When a datapoint takes parameters, they go inside an input object next to the id — that is the shape
the Data Orchestrator expects, and you will see it in the next steps. The
Connectivity Tester inside the platform
takes the parameters at the top level instead, without the input wrapper. The difference catches
everybody once; see
Where "input" actually goes.
OLIVE executes the datapoint and returns the HTTP response.
This confirms that:
- The datapoint definition is valid
- The external service is reachable
Hello World – Step 2: Adding a Second Datapoint
After successfully creating and executing a first datapoint, we now extend the Hello World scenario with a second datapoint.
The goal of this step is not orchestration yet, but to understand how multiple datapoints behave when executed independently.
With this step, we implement the following conceptual flow:
- Datapoint 1: Fetch content from an external system
- Datapoint 2: Process the fetched content (for example, summarize or transform it)
At this stage:
- The datapoints are independent
- There is no connector
- Execution order is controlled manually by the caller
This makes the data flow explicit and easy to understand.
Creating an additional Datapoint
The second datapoint processes input data provided by the caller.
For this Hello World step, the exact processing logic is intentionally kept simple.
The important part is that this datapoint:
- Accepts input
- Produces output
- Can be invoked independently
The second datapoint performs an HTTP POST request to a public echo service.
{
  "id": "helloworld-dp-http-echo",
  "type": "datapoint",
  "version": "0.0.1",
  "name": "helloworld-dp-http-echo",
  "displayName": "helloworld-dp-http-echo",
  "tags": [
    "example",
    "simple-example",
    "scenario-helloworld",
    "scenario-example-helloworld"
  ],
  "description": "Simple HTTP datapoint that echoes input content",
  "datapoint": {
    "type": "http",
    "http": {
      "url": "https://httpbin.org/post",
      "method": "POST",
      "headers": {
        "Content-Type": "application/json"
      },
      "body": {
        "content": "${input.content}"
      }
    }
  }
}
This datapoint:
- Accepts an input parameter named content.
- Sends the input as JSON
- Returns the echoed response from the service
Register this datapoint in the OLIVE Connectivity Editor, just like the first one.
Calling Two Datapoints Manually
To execute both datapoints:
- Call the first datapoint via Bruno
- Copy its output
- Call the second datapoint and pass the output as input
This manual chaining highlights an important limitation:
Without a connector, orchestration is handled manually by the caller.
Invoke the first datapoint using Bruno:
{
  "id": "helloworld-dp-http-get"
}
Copy the response returned by this call.
Invoke the second datapoint and pass the output of the first datapoint as input:
{
  "id": "helloworld-dp-http-echo",
  "input": {
    "content": "<paste response from first datapoint here>"
  }
}
OLIVE executes the second datapoint and returns the echoed result.
Hello World – Step 3: Introducing Connectors
In the previous step, we executed two datapoints manually:
- Call datapoint 1
- Copy output
- Call datapoint 2 and paste input
This works, but it is not scalable.
A Connector solves this by defining a reusable orchestration flow inside OLIVE.
Connector Concept
In OLIVE terms, what we are creating here is a Connector.
A connector:
- Orchestrates multiple connectable elements (typically datapoints)
- Defines the execution order
- Forwards output from one step as input to the next step
A connector is a concrete specialization of the abstract connection concept in the metamodel. Connector
Connector Structure
Similar to datapoints, connectors also follow the “outer metadata + inner definition” pattern.
This would be the basic structure of a connector:
{
  "id": "example-connector",
  "type": "connector",
  "version": "0.0.1",

  "connector": {
    "elements": [
    ]
  }
}
As with a datapoint: the outer object carries the metadata, type classifies the document as a connector,
and the inner connector object holds the definition — here the ordered elements list.
- Connectivity Specialization
The outer type: "connector" classifies the document as a connector instance, while the inner connector object contains the connector-specific definition (execution flow, elements, ordering).
You will see this in JSON as:
-
"type": "connector"(outer object)"connector": { ... }(inner definition)
- Basic Attributes
The basic attributes contains the metadata:
-
idnameversiontagsdescription
This is the same principle as for datapoints: identification and documentation.
- Properties (Connector Elements)
The connector properties define the execution sequence.
A connector consists of an ordered list: "elements": [ ... ]
Each element references:
-
- the element to execute (
element) — usually a datapoint, but a connector or workflow id works too - optional parameters to pass (
parameters) - optional reference name for later usage (
ref)
- the element to execute (
Placeholders and References
Connectors forward data using references and placeholders. For more details read the following documentation: Placeholder Resolutions - Connectable Elements
ref (reference)
A connector element can store its result using:
{ "ref": "someName", ... }
This allows later steps to access the output using:
${ref.someName}
Creating the Hello World Connector
Now we define a connector that executes our two datapoints automatically:
-
First element:
helloworld-dp-http-get -
Second element:
helloworld-dp-http-echo- receives the first output as input parameter
content
- receives the first output as input parameter
{
  "id": "helloworld-c-http-get-to-echo",
  "type": "connector",
  "version": "0.0.1",
  "name": "helloworld-c-http-get-to-echo",
  "displayName": "helloworld-c-http-get-to-echo",
  "tags": [
    "example",
    "simple-example",
    "scenario-helloworld",
    "scenario-example-helloworld"
  ],
  "description": "Hello world connector that executes an HTTP GET and forwards the result to an HTTP echo datapoint.",
  "connector": {
    "elements": [
      {
        "ref": "httpResponse",
        "element": "helloworld-dp-http-get"
      },
      {
        "element": "helloworld-dp-http-echo",
        "parameters": {
          "content": "${ref.httpResponse}"
        }
      }
    ]
  }
}
Register this connector in the OLIVE Connectivity Editor the same way you registered the datapoints.
Now we test the connector using the data-orchestrator API.
{
  "id": "helloworld-c-http-get-to-echo"
}
This returns a response containing a jobID, because connector execution runs asynchronously.
Example response:
{
  "jobID": "helloworld-c-http-get-to-echo-<generated-id>",
  "state": "INVOKED"
}
To retrieve the connector result, call the poll endpoint with the jobID.
Poll the OLIVE data orchestration using the following datapoint (replace <tenant>.<cluster>.<domain> with your actual tenant domain):
https://api.<tenant>.<cluster>.<domain>/data-orchestrator/v1/poll
The request body only needs the job id we received from invoking the connector.
{
  "jobID": "helloworld-c-http-get-to-echo-<generated-id>"
}
You will receive a response with state SUCCESS and the actual result payload (the echoed output).
Hello World – Step 4: Example Scenario - AI Regulation Summary
Up to this point, we have learned the fundamental OLIVE concepts in isolation:
- Datapoints as executable units
- Manual execution via Bruno
- Connectors to automate orchestration
- Passing data between steps using references and placeholders
Now, we apply these concepts to a realistic, end-to-end Hello World use case.
Example Scenario
The scenario is intentionally simple, but realistic:
- A user provides a URL to a publicly available regulation
- A large language model (LLM) generates a two-sentence summary of the regulation
Despite its simplicity, this example already captures the essence of many real-world integration scenarios.
What We Learn
From this example, you will learn that:
- Connectivity is a combination of external services
- Connectivity is a model – reusable, configurable, and portable
- Connectivity can be nested – meaning one connectivity can include or encapsulate another
Conceptual View
General Idea
The process consists of two main steps:
- Get the content of the regulation
- Generate a summary of the regulation using a large language model (LLM)

Abstract View
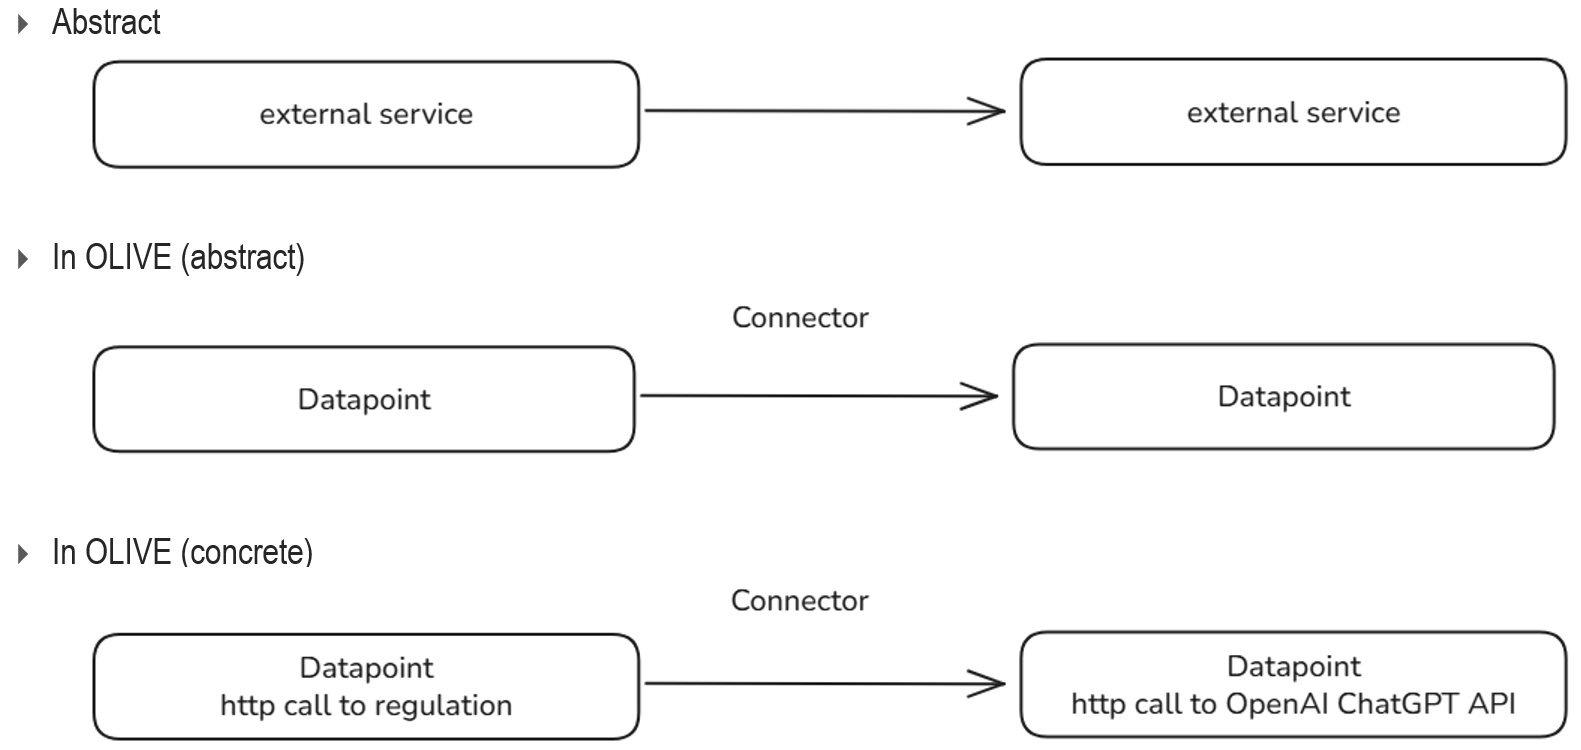
Abstracted from any specific technology, the flow executes the following:
- Call an external service
- Pass its output to another external service
This captures the core idea behind OLIVE:
- Connecting external services
- Passing data between them
- Making these connections reusable and portable through configuration
Technical View
From a technical perspective, this scenario involves two HTTP calls:
- An HTTP call to retrieve the regulation text from a given URL.
- An HTTP call to the OpenAI ChatGPT API to generate the summary of the retrieved content.

OLIVE Perspective
In OLIVE terms, what we are creating here is a Connector.
- A Connector contains Datapoints
- Each Datapoint represents one external service
- The connector defines execution order and data flow
This is illustrated in the abstract and concrete diagrams shown earlier in this chapter.
Steps to Take
To implement the regulation summary use case in OLIVE, we follow three concrete steps:
- Create a datapoint to retrieve the regulation contents via HTTP
- Create a datapoint to call the OpenAI ChatGPT API via HTTP
- Create a connector to connect the two datapoints and forward the regulation content to the AI for summarization
At this stage, OLIVE connects the services automatically and ensures that data flows between them
Additionally, we also have one prerequisite: Access to valid OpenAI credentials in order to call the API.
Prerequisite: Acquiring OpenAI Access Credentials
Before you can use OLIVE to connect to the OpenAI API, you need to have valid credentials. These credentials are required to authenticate your requests and ensure that the services can be accessed securely.
If you already have an OpenAI API key that is active and has sufficient credit, or if one was provisioned for you, you can skip this section.
If not, you need to create your own account and generate an API key.
The process is straightforward:
- First, go to the https://platform.openai.com/ and create an account. During the registration, you will be asked for some basic information and to verify your email address.
- Once your account is set up, you need to make sure it has enough credit. Free accounts without credit cannot access the API, so you may need to add a payment method and purchase credits before you can proceed.
- Finally, you can generate your API key. Navigate to the https://platform.openai.com/api-keys, where you can create and manage your keys. Copy the key and keep it safe, as it will be required later when you configure OLIVE to call the OpenAI APIs.
Authentication Concept
Before continuing with the creation of the datapoints, we first need to introduce authentication, as it is required when calling the OpenAI API from within a datapoint.
Authentication in OLIVE is modeled separately from datapoints.
- Datapoints can reference an Auth entry, but they should not store secrets directly.
- Secret values of Auth entries are stored securely in the OLIVE platform.
- Only datapoints can have auth (connectors do not).
A more detailed conceptual explanation can be found in the Authentication documentation Authentication and Secrets Management
Authentication Structure
A minimal auth entry looks like this:
{
  "id": "example-auth",
  "type": "auth",
  "version": "0.0.1",

  "auth": {
    "type": "bearer",

    "secret": {
    }
  }
}
auth.type selects the authentication mechanism, and the remaining fields inside auth — secret above
all — configure it. The shape of secret.value depends on the type chosen.
-
Authentication Specialization
The field:
"auth": {"type": "bearer"}defines which kind of authentication this configuration represents. For a deeper explanation of the OLIVE metamodel layers and their relationships, see the Metamodel documentation Auth
The supported values are
basicauth,bearer,oauth2andoidc. They are listed with the shape of their secret in Authentication and Secrets Management. -
Basic Attributes
The outer fields identify and document the auth configuration:
idtypeversion- optional fields like
name,tags,description
-
Properties
The remaining fields inside the auth object define how authentication works, depending on the selected auth type.
For bearer authentication, this typically includes:
-
- a secret (API token)
- how the token is injected into requests
Creating the OpenAI Auth Configuration
For the upcoming Hello World scenario example, we create a Bearer token auth for the OpenAI API.
You will need to make one adjustment – add your real OpenAI API access token in place of the current {REPLACE_WITH_OPENAI_API_KEY} placeholder.
{
  "id": "helloworld-a-openai-token",
  "type": "auth",
  "version": "0.0.1",
  "name": "helloworld-a-openai-token",
  "displayName": "helloworld-a-openai-token",
  "tags": [
    "example",
    "simple-example",
    "scenario-helloworld",
    "scenario-example-helloworld"
  ],
  "description": "Bearer token authentication for OpenAI API access (Hello World example).",
  "auth": {
    "type": "bearer",
    "secret": {
      "key": "helloworld-a-openai-token",
      "value": "{REPLACE_WITH_OPENAI_API_KEY}"
    }
  }
}
Secrets stored in Auth configurations are handled securely by OLIVE and are not embedded directly into datapoints.
Integrating plaintext access token in your configurations, is not good practice. Make sure to use auth type entries to securely handle secrets.
Now that we created the necessary auth entry, we can continue with the creation of all other entries needed for the scenario example.
Creating the Connectable Elements for the Scenario Example
Datapoint 1: Fetch Regulation Content
This datapoint retrieves the regulation text from a user-provided URL.
{
  "id": "helloworld-dp1-hello-world-http-get",
  "type": "datapoint",
  "version": "0.0.1",
  "name": "helloworld-dp1-hello-world-http-get",
  "displayName": "helloworld-dp1-hello-world-http-get",
  "tags": [
    "example",
    "simple-example",
    "scenario-helloworld",
    "scenario-example-helloworld"
  ],
  "description": "Simple example datapoint that performs an HTTP GET request to a user-provided URL. Intended as a minimal \"hello world\" example for testing connectivity and request execution.",
  "datapoint": {
    "type": "http",
    "http": {
      "url": "${input.url}",
      "method": "GET"
    }
  }
}
This datapoint:
- Accepts a URL as input
- Retrieves its content via HTTP GET
- Returns the response body
Datapoint 2: Generate AI Summary
This datapoint sends the retrieved content to the OpenAI ChatGPT API and returns a two-sentence summary.
Authentication is not embedded directly into the datapoint.
Instead, this datapoint references a previously created Auth configuration, which contains the OpenAI API access token.
Creating the OpenAI Auth Configuration
This separation ensures that credentials are handled securely and independently from the datapoint definition.
Examining the datapoint reveals that it:
- Issues an HTTP
POSTrequest to the OpenAI API - Sends a predefined prompt together with the retrieved content
- Uses an Auth configuration to apply the required authentication automatically
{
  "id": "helloworld-dp2-hello-world-summary-prompt",
  "type": "datapoint",
  "version": "0.0.1",
  "name": "helloworld-dp2-hello-world-summary-prompt",
  "displayName": "helloworld-dp2-hello-world-summary-prompt",
  "tags": [
    "example",
    "simple-example",
    "scenario-helloworld",
    "scenario-example-helloworld"
  ],
  "description": "Hello world example datapoint that sends user-provided content to a language model and returns a concise summary consisting of exactly two sentences.",
  "datapoint": {
    "type": "http",
    "http": {
      "url": "https://api.openai.com/v1/chat/completions",
      "method": "POST",
      "body": {
        "model": "gpt-5",
        "messages": [
          {
            "role": "developer",
            "content": "You are a tool to summarize content and return the summary of the user input in pure text form in exactly two sentences."
          },
          {
            "role": "user",
            "content": "${input.content}"
          }
        ]
      }
    },
    "auth": "helloworld-a-openai-token"
  }
}
Creating the Connector
Now we connect both datapoints using a connector. This connector links two elements — in our case, datapoints — in sequence. It also passes the output of the first datapoint as the input to the second.
{
  "id": "helloworld-c1-hello-world-to-summary",
  "type": "connector",
  "version": "0.0.1",
  "name": "helloworld-c1-hello-world-to-summary",
  "displayName": "helloworld-c1-hello-world-to-summary",
  "tags": [
    "example",
    "simple-example",
    "scenario-helloworld",
    "scenario-example-helloworld"
  ],
  "description": "Hello world example connector that performs an HTTP GET request to a provided URL and then summarizes the response content using a summary datapoint.",
  "connector": {
    "elements": [
      {
        "ref": "httpResponse",
        "element": "helloworld-dp1-hello-world-http-get"
      },
      {
        "element": "helloworld-dp2-hello-world-summary-prompt",
        "parameters": {
          "content": "${ref.httpResponse}"
        }
      }
    ]
  }
}
Test the Scenario Example
To test the connector, invoke it via the data orchestrator using the following datapoint (replace <tenant>.<cluster>.<domain> with your actual tenant domain):
https://api.<tenant>.<cluster>.<domain>/data-orchestrator/v1/invoke
{
  "id": "helloworld-c1-hello-world-to-summary",
  "input": {
    "url": "https://en.wikipedia.org/wiki/Artificial_Intelligence_Act"
  }
}
Note that the provided URL must be publicly accessible. The datapoint performs an unauthenticated HTTP GET request and therefore cannot access protected or internal resources.
Please check if the URL is not outdated.
This API call returns the following response containing a newly created jobID:
{
  "jobID": "helloworld-c1-hello-world-to-summary-<generated-id>",
  "state": "INVOKED"
}
This jobID can then be used to check the execution state of the job using the following datapoint:
https://api.<tenant>.<cluster>.<domain>/data-orchestrator/v1/poll
{
    "jobID": "helloworld-c1-hello-world-to-summary-<generated-id>"
}
You will receive a response containing a SUCCESS state and the actual result of your connector execution, which should be a summary of the provided url.
The regulation document referenced in this example is quite large. As a result, ChatGPT may take 40–50 seconds to process the request. This is normal and expected behavior.
Exchanging the AI Model with Minimal Changes
One important takeaway from this scenario is how little the overall structure depends on the concrete AI provider.
In our current setup, the second datapoint calls the OpenAI ChatGPT API to generate a summary of the regulation. From an OLIVE perspective, however, this is simply one HTTP-based datapoint that receives text as input and returns a summary as output.
If we wanted to use a different large language model, such as Mistral, the overall scenario would remain unchanged:
- The datapoint that retrieves the regulation content stays exactly the same
- The connector that orchestrates the execution and forwards data stays exactly the same
- Only the AI-specific datapoint changes (endpoint, request payload, and credentials)
Conceptually, both variants follow the identical flow:
- Retrieve regulation content from a URL
- Send that content to an AI service
- Receive a summarized response
From OLIVE’s point of view, the AI call is just another external service. Whether that service is provided by OpenAI, Mistral, or any other vendor does not affect the surrounding structure.
Below is a conceptual comparison showing the existing ChatGPT datapoint alongside a corresponding Mistral datapoint, highlighting the differences between the two. (Changed fields: url, model and auth id reference)
ChatGPT - datapoint example
{
  "id": "helloworld-dp2-hello-world-summary-prompt",
  "type": "datapoint",
  "version": "0.0.1",
  "name": "helloworld-dp2-hello-world-summary-prompt",
  "displayName": "helloworld-dp2-hello-world-summary-prompt",
  "tags": [
    "example",
    "simple-example",
    "scenario-helloworld",
    "scenario-example-helloworld"
  ],
  "description": "Hello world example datapoint that sends user-provided content to a language model and returns a concise summary consisting of exactly two sentences.",
  "datapoint": {
    "type": "http",
    "http": {
      "url": "https://api.openai.com/v1/chat/completions",
      "method": "POST",
      "body": {
        "model": "gpt-5",
        "messages": [
          {
            "role": "developer",
            "content": "You are a tool to summarize content and return the summary of the user input in pure text form in exactly two sentences."
          },
          {
            "role": "user",
            "content": "${input.content}"
          }
        ]
      }
    },
    "auth": "helloworld-a-openai-token"
  }
}
Mistral - datapoint example
{
  "id": "helloworld-dp2-hello-world-summary-prompt",
  "type": "datapoint",
  "version": "0.0.1",
  "name": "helloworld-dp2-hello-world-summary-prompt",
  "displayName": "helloworld-dp2-hello-world-summary-prompt",
  "tags": [
    "example",
    "simple-example",
    "scenario-helloworld",
    "scenario-example-helloworld"
  ],
  "description": "Hello world example datapoint that sends user-provided content to a language model and returns a concise summary consisting of exactly two sentences.",
  "datapoint": {
    "type": "http",
    "http": {
      "url": "https://api.mistral.ai/v1/chat/completions",
      "method": "POST",
      "body": {
        "model": "mistral-small-2503",
        "messages": [
          {
            "role": "developer",
            "content": "You are a tool to summarize content and return the summary of the user input in pure text form in exactly two sentences."
          },
          {
            "role": "user",
            "content": "${input.content}"
          }
        ]
      }
    },
    "auth": "helloworld-a-mistral-token"
  }
}
Even in this simple Hello World example, the design is already reusable. Exchanging the AI model does not require redesigning the scenario — only replacing one connectable element with another that fulfills the same role.
In later chapters, we will build on this idea and show how OLIVE makes such variations explicit and configurable, allowing a single scenario definition to support multiple AI models without duplication: How to Customize and Parametrize Connectivity
Lessons Learned
Having completed the first steps, this is a good moment to review the key lessons learned from the Hello World exercise.
You have now seen OLIVE in action:
- You built your first connectivity use case.
- You discovered that connectivity in OLIVE is modelled in JSON, not scripted manually.
- You created your first datapoints and a connector, and successfully tested them.
Along the way, you also learned that deploying a use case in OLIVE is straightforward. Security, deployment, and operational aspects are handled automatically by OLIVE, allowing you to focus on designing and connecting services rather than worrying about the infrastructure.