12 Client Microfrontends
This section describes how to develop, build, and deploy custom client microfrontends.
A microfrontend represents a web page that is accessible via a dedicated URL. Each microfrontend is composed of one or more client components. These client components can emit events and expose functions.
Connectivity can be attached to these events and functions to wire client components together and to integrate backend service functionality using the full capabilities of the connectivity orchestration layer.
This wiring is defined within a microfrontend data metamodel instance.
Microfrontend instances can be created, read, updated, and deleted using the Connectivity Editor.
Microfrontend data metamodel instances are interpreted and rendered by the OLIVE core service microfrontend-interpreter. As a result, each microfrontend is addressable via a URI and can be opened directly in a client-side web browser.
The functionality implemented within UI components runs on the client side, directly in the user’s browser.
The concepts and APIs described in this section are in a prototype stage.
Both the microfrontend data metamodel and the APIs used for registration and deployment are subject to change in future releases.
Development based on these concepts is therefore at your own risk.
Future versions may require refactoring to accommodate new concepts or APIs.
At this time, these APIs and data metamodels are not further documented.
Architecture
Data Metamodel
Instances of the Data Metamodel can be viewed, created, edited, and deleted in the connectivity editor.
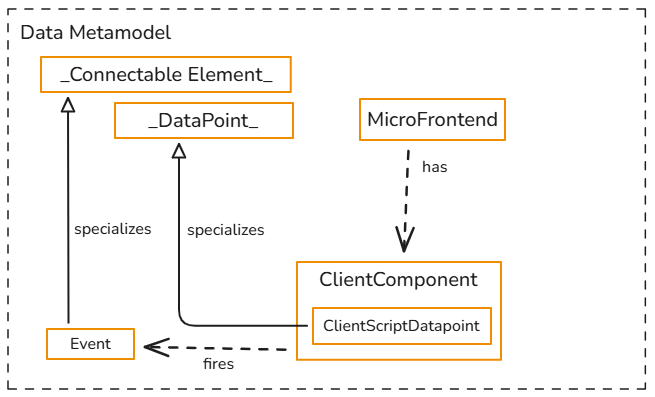
ClientComponent
A ClientComponent represents an executable UI component whose client-side code runs in the browser and defines the datapoints and events exposed to the connectivity layer.
Example: A button component.
Each ClientComponent references, by ID, a corresponding piece of built client-side UI component code. This built code is stored in the OLIVE Platform file-storage-service.
The association between the ClientComponent ID and the corresponding code artifact — specifically, the storage location and identifier of the built code in the file-storage-service — is maintained in the OLIVE Platform ui-component-registry.
Through this mechanism, a ClientComponent defined in the data metamodel is explicitly linked to its concrete implementation code at runtime.
Event
- Specializes a
_ConnectableElement_. - Is fired by a
ClientComponent. - Example: "onClick" of the button
ClientScriptDatapoint
- Specializes a
_DataPoint_. - Is provided by a
ClientComponent. - Represents callable or bindable client-side logic/data.
- Example: "setEnabled ()" of the button
MicroFrontend
A MicroFrontend aggregates one or more ClientComponent instances to form a complete, addressable UI unit.
It is responsible for:
-
Layout definition
Specifies how ClientComponents are arranged within the page.
Example: Four buttons are positioned horizontally next to each other. -
Connectivity configuration
Defines how events and datapoints exposed by ClientComponents are wired together.
Examples:- The
onClickevent of Button 1 disables Button 2. - The
onClickevent of Button 3 triggers the execution of a connector when the event occurs.
- The
In this way, the MicroFrontend declaratively defines both the structural layout and the interaction logic of the composed UI.
Functionality of OLIVE Core Service
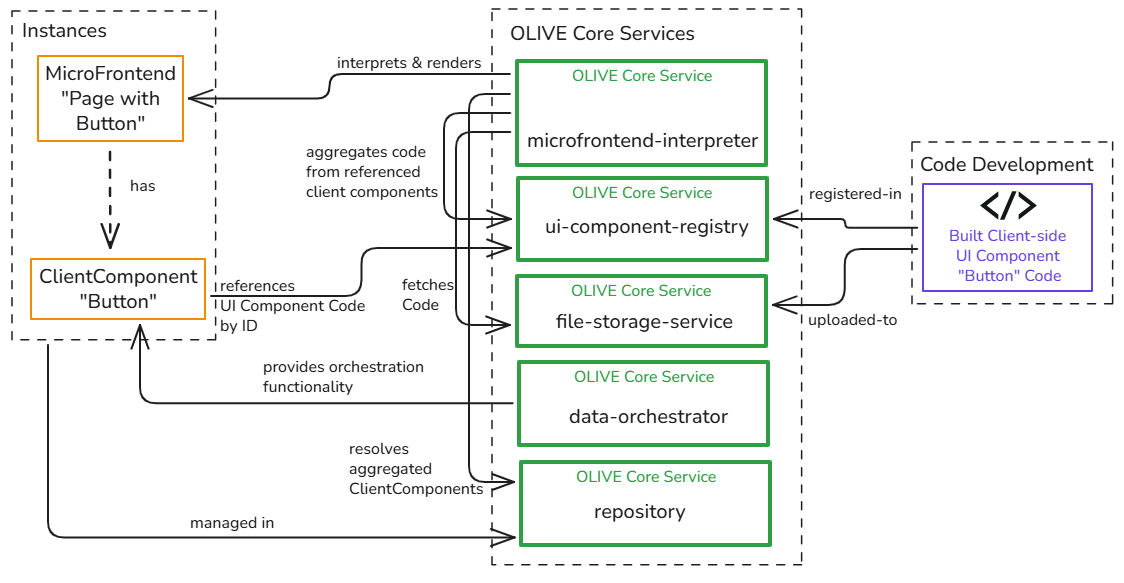
On the left, data metamodel instances define the structure of a MicroFrontend and its contained ClientComponents.
On the right, client-side code is developed, built, and registered.
In the center, OLIVE core services coordinate resolution, orchestration, and runtime rendering.
Code Development and Registration
-
Client-side UI Component code (e.g., built Button code) is developed and built independently.
-
The built artifact is uploaded to the file-storage-service.
-
The same artifact is registered in the ui-component-registry, which stores:
- The ClientComponent ID
- The corresponding file-storage location of the built UI Component code
This establishes the binding between the data metamodel and executable client-side code.
OLIVE Core Services Responsibilities
- microfrontend-interpreter
Interprets MicroFrontend instances and renders them at runtime. It aggregates the client-side code referenced by the contained ClientComponents. - ui-component-registry
Resolves ClientComponent IDs to concrete code artifacts stored in the file-storage-service. - file-storage-service
Stores the built client-side code artifacts. - data-orchestrator
Provides orchestration functionality, enabling connectivity and interaction logic between ClientComponents and any other instances of _ConnectableElement_. - repository
Manages and resolves MicroFrontend and ClientComponent instances defined in the data metamodel.
What a Pilet May Call at Runtime
A pilet rendered by the microfrontend-interpreter runs in an authenticated user's browser session, so from OLIVE 1.3 it can no longer call every platform service directly. What remains reachable is deliberately narrow.
Pilets that called other services directly, or used methods other than the ones below, stop working. This is the change most likely to affect an existing UI component.
| Service | How it is called | What a pilet may do |
|---|---|---|
data-orchestrator | Local path /data-orchestrator/ | Everything the orchestrator offers. This is the intended route for anything that changes data |
repository | Local path /repository/get | The get function only — read a connectable element. Nothing else on the repository is reachable |
file-storage-service | The public API, not a local path | GET only — for example to render an image in the component. Uploads and any other method must go through the data-orchestrator |
The first two are local paths: call them relative to the page the component is rendered on, not against an absolute host name. The file storage is the exception — a pilet reaches it through the public file-storage-service API, for example:
https://api.<tenant>.<cluster>.<domain>/file-storage-service/get?key=<file-key>
The reasoning is the same in all three cases. Code running in somebody's session should be able to read what it needs to render and to hand work to the orchestrator, which applies the caller's permissions — it should not be able to write directly into the repository or the file store. If your component needs to store a file, upload it through the orchestrator; if it needs to change a connectivity element, that is orchestration work, not UI work.
Session memory
Session memory is reached through the orchestrator, and its handling changed in 1.3: see Security in Connectivity Engineering for what else is bound to the creating user.
Your Security Responsibilities as a UI Component Developer
The section above lists what OLIVE's core services are responsible for. This one lists what you are responsible for, because a pilet is not ordinary application input — it is code that OLIVE loads into somebody else's authenticated session.
Where your code actually runs
A pilet is downloaded from the file storage service and executed in the browser of an authenticated OLIVE user, on the same origin as the rest of the platform. That means it runs with that user's session, sees what they see, and can act as they can act.
Nothing sandboxes it from the user's session. The platform guards its own boundaries — authentication, tenant isolation, egress control, file access, Content Security Policy — but inside the page, your code has the privileges of the person running it. A defect in a pilet is therefore not contained the way a bad value in a datapoint is.
That is the whole reason this section exists.
Review your code before it goes to production
Have your pilet code security-reviewed before you hand it over for a production deployment, by someone other than the person who wrote it.
Your Tenant Admin is expected to review UI component code before enabling it in a production tenant. That is a second line of defence, not a substitute for yours: they can see what your code does, but you are the only one who knows what it was meant to do.
Review the build output as well as the source. What ships to the browser is the bundle, not your repository.
What to check
Rendering data you did not write
- Never pass values from a datapoint, a URL parameter, a
postMessage, or user input intoinnerHTML,outerHTML,document.writeor a framework's raw-HTML escape hatch (dangerouslySetInnerHTML,v-html,[innerHTML]). - Use the framework's normal binding, which escapes for you.
- If you genuinely must render HTML, sanitise it with a maintained sanitiser rather than a regular expression of your own.
Links and navigation
- Every link that opens a new window needs
rel="noopener noreferrer". Withoutnoopener, the opened page gets a handle on your window throughwindow.openerand can navigate it somewhere else — a phishing page indistinguishable from OLIVE.noreferreradditionally stops the OLIVE URL leaking in theRefererheader. - The same applies to
window.open()— passnoopenerin the feature string. - Never build a destination URL from unvalidated input, and never allow a
javascript:ordata:URL to reach anhref.
Secrets
- Nothing secret belongs in a pilet. The bundle is downloaded to the browser; anyone who can open the page can read every line of it. No API keys, no tokens, no passwords, no internal hostnames.
- Call the target system through an OLIVE datapoint instead. OLIVE holds the credential in Vault and never hands it to the browser.
- Do not copy the user's session token into
localStorage,sessionStorage, a cookie of your own, or any request to a destination other than OLIVE.
Dependencies
- Everything you depend on ships into the user's browser, so your dependency tree is part of OLIVE's attack surface.
- Pin exact versions and commit a lockfile.
- Audit before release (
npm audit,yarn npm audit) and resolve what it finds. - Prefer fewer, well-maintained dependencies. Be wary of packages published very recently — the common npm attack is a compromised maintainer account publishing a malicious version that is discovered within days.
Third-party content
- Any external script, font, stylesheet, iframe or analytics endpoint you embed becomes part of the platform's trust boundary, and it is loaded into an authenticated session.
- Prefer bundling assets over loading them from a CDN at runtime.
- Where a remote script is unavoidable, use Subresource Integrity and be prepared to justify it during review.
Content Security Policy
- Work within the CSP rather than asking for it to be relaxed. A request to allow
unsafe-inlineorunsafe-evalis a design problem, not a configuration problem. - Avoid
eval,new Function, and the string forms ofsetTimeoutandsetInterval.
Cross-window messaging
- Validate
event.originin everymessagelistener before trusting the payload. A listener without that check accepts messages from any page that can reach your window. - Never use
'*'as the target origin when posting anything sensitive.
Logging and error handling
- Console output is visible to the user and to anything running in the page. Do not log tokens, credentials or personal data.
- Do not surface raw error objects or stack traces in the UI.
Build output
- Ship a production build. Development builds carry extra tooling, verbose errors and sometimes source paths that need not be public.
- Confirm that nothing from your local environment —
.envfiles, fixtures with real data, test credentials — has been bundled.
Checklist before using component in a use case
- Code reviewed for security by someone other than the author
- No secrets, tokens, API keys or internal hostnames in the source or the bundle
- No untrusted data reaching
innerHTMLor an equivalent -
rel="noopener noreferrer"on every link that opens a new window - No
javascript:ordata:URLs built from input - Dependencies pinned, lockfile committed, audit clean
- External scripts justified, or bundled instead
- No CSP exemptions requested
-
event.originvalidated in every message listener - No credentials or personal data written to the console
- Production build, with nothing from the local environment bundled
General guidance
These are ordinary web application security concerns — nothing about them is specific to OLIVE. If a point above is unfamiliar, the canonical references are:
- OWASP Top 10 — the risks worth knowing by name
- OWASP Cross Site Scripting Prevention Cheat Sheet
- OWASP DOM based XSS Prevention Cheat Sheet
- MDN:
rel="noopener"andrel="noreferrer" - MDN:
Window.opener— whatnoopeneris protecting you from
For the platform-side controls and what OLIVE enforces for you, see Security in Connectivity Engineering.
Developing UI Component Code for ClientComponent
Prerequisites
Use the UI code template project project "UI Component Blueprint Project" from the latest development package.
This project is a client-side microfrontend built with React, TypeScript and Vite. Dependencies are managed with Yarn and the deployment is automated with a Python script.
Knowledge developing with TypeScript and React helps.
Extract the content to a folder named "my-card". We recommend using VS Code as an editor.
Required Tooling
The following tools must be installed locally before working with this project:
Node.js
- Version: ≥ 24.x (LTS recommended)
- Required to run the build, development server, and deployment tooling.
Verify installation:
node --version
Yarn
- Version: Yarn 4.18.0 (Berry), pinned by the
packageManagerfield inpackage.json - Corepack activates exactly this version, so there is nothing to install by hand and no reason to use a newer one.
Enable Corepack (recommended):
Note: Depending on your environment, administrative privileges may be required to execute the following two commands.
corepack enable
corepack prepare yarn@4.18.0 --activate
Verify installation:
yarn --version
To enable local UI component testing using the development feature, we rely on Yarn to be configured with the node-modules linker (nodeLinker: node-modules) in order to function correctly.
Please verify your Yarn configuration by checking the .yarnrc or .yarnrc.yml file in your user directory (on Windows systems). Ensure that the nodeLinker setting is configured as shown in the example below:

For additional details, refer to the official Yarn documentation:
https://yarnpkg.com/features/linkers
Piral CLI
Piral (https://piral.io/) is the framework used to package a UI component as a pilet.
The CLI is pinned as a dev dependency of src/pilet-template (piral-cli 1.12.4) and is invoked through npx pilet, so no global installation is needed — and a global install risks building with a different version than the project expects.
Verify it once the pilet-template dependencies have been installed, which happens during the first yarn deploy:
cd src/pilet-template
npx pilet --version
Python
We are utilizing a custom Python script to automate all deployment-related steps for UI components.
To be able to use this automation, Python must be installed locally.
If Python is not available, all deployment steps must be executed manually. The corresponding manual steps are also described in this document.
- Python 3.10 or higher
Verify your installation by running:
python --version
Make sure that pip, Python’s standard package manager, is installed and functioning correctly, and verify that the requests module is installed and available in your Python environment.
pip install requests
Code Repository Structure
The code project contains multiple folders and files, not all of which are intended to be customized or modified. Please ensure that you have read and understood the disclaimer, as the project is currently in a prototype state.
This section highlights the folders and files that are relevant for developing custom UI code and that are important to understand when creating your own UI components.
This repository is structured in three logical layers:
- Outer Project (Workspace / Host Layer)
- Inner UI Component Project (ClientComponent Implementation Layer)
- Inner Pilet Template Project
Only a subset of files in each layer is relevant depending on whether you are developing, building, or deploying a ClientComponent.

The outer project acts as the workspace root.
- The outer project does not contain deployable UI component code.
- It primarily exists to support development and integration workflows.
- Not all files in this layer are required for component deployment.
The inner UI Component project (src/component) contains the actual ClientComponent implementation and the configuration required to build and deploy it to the OLIVE platform.
Responsibilities:
- Client-side UI implementation (React / TypeScript)
- Component-specific build configuration
Relevant Files:
src/component/
├─ src/                     # ClientComponent source code
├─ App.tsx                  # Root React component
├─ main.tsx                 # Client entry point
├─ package.json             # Component-specific dependencies and scripts
Inside src/component/src you will find two additional files:
src/component/src
├─ component.css                 # Style sheet of the component
├─ component.tsx                 # Business logic of the component
The component.css file is used to define the styles required by the UI component.
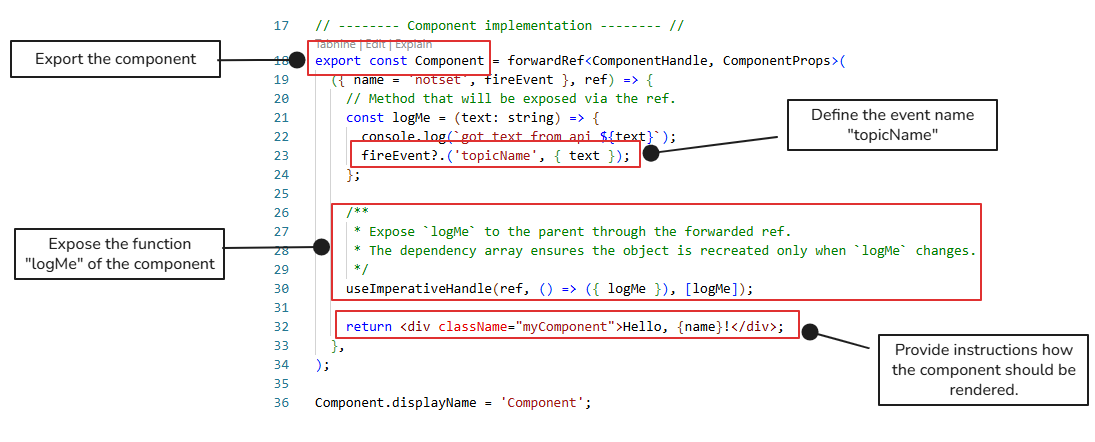
The component.tsx file exports the React component and serves as the central entry point for the component’s implementation. While functionality may be implemented across multiple files, this file is responsible for:
- Exporting the component
- Defining which events are emitted
- Exposing functions that correspond to
ClientScriptDatapointinstances
Together, these files establish the visual appearance and the interaction contract of the UI component.
If we closer inspect component.tsx file, we can identify the following crucial declarations:
The inner Pilet Template project (src/pilet-template) contains the wrapper and build logic required to transform a UI component into a microfrontend element that can be dynamically loaded at runtime into a larger microfrontend application.
This project encapsulates the necessary integration layer, enabling the UI component to be packaged, built, and consumed as an independently deployable microfrontend.
For this purpose, the project leverages the architecture and tooling provided by Piral (a framework for building modular, federated microfrontend applications).
Open in src/pilet-template/package.json and provide a name in the package.
Initialize and Test
Develop and deploy your UI component to an OLIVE development deployment first, and test the component and the microfrontend that uses it there. A development deployment has no authentication and a single user holding every role, so nothing blocks you while you iterate.
When it works, move it to production as described in Move the component to a production deployment — not by pointing the deploy script at production.
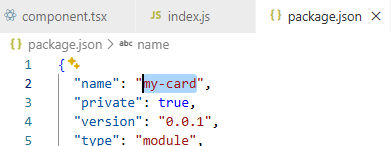
We first adapt the package.json of the root of your project ./my-card/. and change the name property from "component-app" to the name of your UI component, e.g. "my-card".
Navigate in the console to the root of your project ./my-card/. and execute:
yarn install
This installs the development dependencies of the outer project via Yarn that is defined in package.json.
The blueprint pins its dependencies to exact versions. The main ones, as shipped in version 0.0.1 of the blueprint:
| Dependency | Version | Where |
|---|---|---|
| React / React DOM | 18.3.1 | outer project, UI component and pilet |
| TypeScript | 5.9.3 | outer project and UI component |
| Vite | 6.4.3 | outer project — dev server and yarn dev |
| webpack | 5.111.x | builds the UI component and the pilet |
| Babel | 7.29.x | UI component build |
| ESLint | 8.57.1 | with the React, Import and SonarJS plugins |
| piral-cli / piral-cli-webpack5 | 1.12.4 | pilet packaging, in src/pilet-template |
Check the blueprint's own package.json files for the authoritative list — the versions are pinned there deliberately, and changing one is a decision rather than an upgrade.
Next, install the dependencies of the inner UI component project by executing the following command from the project root:
yarn setup
This command automatically installs all dependencies required by the UI component located in ./my-card/src/component. It equals to running yarn install inside the ./my-card/src/component path.
If your UI component depends on additional third-party libraries, you can add them using the yarn add command. To do this you will need to navigate to this path first ./my-card/src/component.
However, exercise caution when introducing new third-party dependencies. In environments where a microfrontend aggregates multiple UI components, conflicts may arise if the same library is included in different versions across components.
To minimize the risk of version conflicts, carefully evaluate dependency choices and prefer alignment with existing libraries whenever possible.
Next we navigate back to the root of the project ./my-card/. and execute:
yarn dev
This will spin up an ad-hoc local application that allows you to view and test the UI component
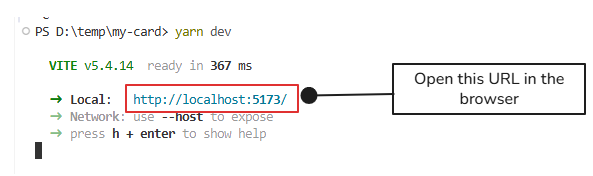
When you enter the generated local URL in the browser you will already see this:

Now in your project locate the file App.tsx.
App.tsx is used by the preview and test tool to show your component. It also passes properties to the component, in our case a name.
Change the name, e.g. to "OLIVE".
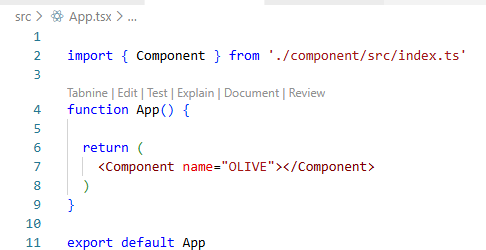
The preview will change automatically to the new name.

Deploy the UI Component
The steps below deploy the UI component straight into an OLIVE deployment through the file-storage-service and the ui-component-registry. Point them at a development deployment.
Deploying or changing a pilet in a production deployment requires the admin role, because a pilet runs inside an authenticated user's browser session and is therefore an administrative change. The route into production is an OLIVE Connectivity Bundle, not this script — see Move the component to a production deployment.
Either way, run through Your Security Responsibilities as a UI Component Developer before the component leaves your machine. That checklist is what your Tenant Admin will expect you to have completed.
The deployment flattens each file's path into a single upload key, with @@ between the segments — assets/images/diagram.png becomes assets@@images@@diagram.png. The file storage rejects a key containing a space with key contains unsupported characters, so one badly named file fails its own upload while everything else succeeds. Use _ instead of spaces throughout the component, including in asset file names. See File Handling in Connectivity.
For deploying the UI component, there are two available options:
You can either use the automated deployment using a python script provided by the project, or follow the manual deployment steps which are also described in this segment.
We will first describe the automated deployment approach, followed by a detailed explanation of the manual deployment steps.
Before that, the following section provides a brief overview of the individual steps required to successfully deploy a UI component.
To be deployed successfully on OLIVE, a UI component goes through the following high-level steps:
- Build the UI component
The client-side UI code is built and packaged into a distributable format. - Package the component as a pilet
The built UI component is wrapped using the pilet template so it can be loaded dynamically by OLIVE. - Upload the build artifacts
The generated files are uploaded to the OLIVE file-storage-service, in thecorecategory. That category is what protects platform files from being overwritten by ordinary users, and writing to it requires the admin role in an authenticated deployment — another reason the script is meant for a development deployment. See File Handling in Connectivity. - Register the UI component
The main entry file (index.js) is registered in the OLIVE ui-component-registry so it can be referenced by ClientComponents.
Once these steps are completed, the UI component can be used within ClientComponents and MicroFrontends configured in OLIVE.
Automated Deployment
Make sure you have all the prerequisites installed before continuing! Python is essential for the automated deployment, if you don't want to or can't use Python proceed with the manual deployment.
The automated deployment relies on a configuration file named deploy.config.json, located in the project root.
This file defines all environment-specific values required for building, uploading, and registering the UI component.
Before running the automated deployment, ensure this file is present and correctly configured.
Configuration
The configuration, in the file deploy.config.json, defines four main values apiBaseUrl, useBearerToken, bearerToken and paths which we describe in more detail now.
Environment
This value is mandatory. Deployment will fail if it is missing or invalid.
The value apiBaseURL specifies the base URL for the target environment.
This value is used for:
- uploading build artifacts to the file-storage-service
- registering the UI component in the ui-component-registry
The URL should follow this structure, no additional '/' at the end:
https://api.<tenant>.<cluster>.<domain>
Optional Authentication
For environments that require authentication for uploads and registry access.
In such cases, enable and configure the following options:
useBearerToken
Set totrueif the target environment requires authentication.bearerToken
The bearer token used to authenticate requests.
This value is only required ifuseBearerTokenis enabled.
A development deployment has no authentication, so these can be left unchanged there. You only need them when uploading into an authenticated deployment, and in that case the account behind the token needs the admin role.
Internal Paths
These values are preconfigured for the project structure and must not be changed, as incorrect paths may cause the deployment to fail.
The configuration file also contains path definitions for internal project folders:
paths.componentDirpaths.piletTemplateDirpaths.piletDistDir
These paths are used by the deployment script to locate the UI component, the pilet template, and the build output.
Once the configuration file is correctly set up, the automated deployment can be triggered as described in the next section.
Trigger Deployment
The automated deployment is implemented as a custom Python script located at scripts/deploy_ui_component.py and executed by yarn.
It is triggered using the following command from the project root:
yarn deploy
The script reads all required configuration from deploy.config.json and performs the complete deployment steps automatically. If you are interested which command the python script automated exactly you can either look at the python script itself or at the manual commands explained in the next segment.
Manual Deployment
The following section describes the manual deployment process for a UI component in OLIVE.
This approach follows the same underlying steps as the automated deployment, but requires executing each step explicitly and in the correct order.
Build the Code
Following the "Initialize and Test" segment we are building and packaging the code that we can upload and register it.
Navigate to the inner project ./my-card/src/component and execute
yarn build
Inside the folder ./my-card/src/component/dist/ a new file called "index.js" was created that contains the built and packaged UI component.
Now navigate to ./my-card/src/pilet-template and execute this command:
npm install ../component
Next we build the pilet by calling in this folder ./my-card/src/pilet-template this command:
pilet build
If you navigate into the directory ./my-card/src/pilet-template/dist you will find several new generated files:

These files we will upload in the next steps using the OLIVE Platform file-storage-service and then register the new UI component in the OLIVE Platform ui-component-registry.
Some files might have 0 content, e.g. index.d.ts - you do not need to upload these files. In this example only index.js, index.js.map, main.css, and main.css.map need to be uploaded.
Upload the Built Code
To begin, open the package.json file of the outer root project:
./my-card/package.json

From this file, extract the name and version fields. The full package name is constructed using the following pattern:
<name>@<version>
Example:
my-card@0.0.1
Next we prepare the file uploads.
For each file with content located in:
./my-card/src/pilet-template/dist
an upload URL and corresponding JSON metadata must be generated.
Files are uploaded using the public upload endpoint of the file-storage-service API.
The base URL follows this pattern:
https://api.<tenant>.<cluster>.<domain>/file-storage-service/upload
Example:
https://api.<tenant>.<cluster>.<domain>/file-storage-service/upload
To form the final upload URL:
- Append the package name (
<name>@<version>) - Append the file path relative to the
distdirectory
Example (for ./dist/index.ts):
https://api.<tenant>.<cluster>.<domain>/file-upload-service/upload/my-card@0.0.1/index.ts
Next we prepare the file metadata.
Each uploaded file must include JSON metadata containing a unique file key.
The key follows this pattern:
@olive/<package-name>/<relative-file-path>
Example (for index.ts):
@olive/my-card@0.0.1/index.ts
This key is wrapped into a JSON object as follows:
{
  "key": "@olive/mycard@0.0.1/index.ts"
}
Once the upload URL and metadata have been prepared for each file in the dist directory, you can proceed with uploading the files using the file-storage-service.
The command below assumes to be in the directory of ./my-card/src/pilet-template/dist:
For Linux (e.g. Ubuntu WSL)
curl -X POST \
  https://api.<tenant>.<cluster>.<domain>/file-storage-service/upload/my-card@0.0.1/index.ts \
  -F "file=@index.ts" \
  -F "key=@olive/mycard@0.0.1/index.ts"
For Powershell Windows
curl.exe -X POST "https://api.<tenant>.<cluster>.<domain>/file-storage-service/upload/my-card@0.0.1/index.js" `
  -F "file=@index.js" `
  --form-string "key=@olive/mycard@0.0.1/index.js"
-
-X POST
Uses an HTTP POST request, as required by the upload API. -
-F "file=@index.ts"
Uploads the file as multipart form data. -
-F "key=@olive/mycard@0.0.1/index.ts"
Sends the metadata field. -
The URL includes:
- The package name (
my-card@0.0.1) - The file path relative to the
distdirectory (index.ts)
- The package name (
For example executing it in Windows Powsershell:

Upon successful upload, the file-storage-service returns a JSON response containing metadata for the uploaded file.
Example response:
{
  "url": "https://api.<tenant>.<cluster>.<domain>/file-storage-service/get?key=my-card@0.0.1-index.js",
  "key": "my-card@0.0.1-index.js",
  "filename": "index.js"
}
url
The public URL of the uploaded file. This URL can be used to retrieve the file from the file-storage service.key
The unique identifier under which the file is stored. This key is used to fetch the file via the file-storage service API.filename
The name of the uploaded file as stored in the service.
This response confirms that the file has been successfully stored and provides all information required to reference and retrieve it later.
If you use an API tool such as Bruno instead of the provided curl commands, ensure that all values you pass follow the structure described above. In particular, the URL structure must match the curl examples exactly — any mismatch may cause issues.
Now we upload all the other files with content as well and collect the responses:
  {"url":"https://api.<tenant>.<cluster>.<domain>/file-storage-service/get?key=my-card@0.0.1-index.js","key":"my-card@0.0.1-index.js","filename":"index.js"}
  {"url":"https://api.<tenant>.<cluster>.<domain>/file-storage-service/get?key=my-card@0.0.1-index.js.map","key":"my-card@0.0.1-index.js.map","filename":"index.js.map"}
  {"url":"https://api.<tenant>.<cluster>.<domain>/file-storage-service/get?key=my-card@0.0.1-main.css","key":"my-card@0.0.1-main.css","filename":"main.css"}
  {"url":"https://api.<tenant>.<cluster>.<domain>/file-storage-service/get?key=my-card@0.0.1-main.css.map","key":"my-card@0.0.1-main.css.map","filename":"main.css.map"}
Register the Built Code
After uploading the built UI component files to the file-storage-service, we create an entry in the ui-component-registry. This registry entry allows ClientComponent instances to reference the UI component code stored in the file-storage-service.
Only the index.js file needs to be registered in the ui-component-registry. This file was already uploaded in the previous step to the file-storage-service, and the registry entry acts as a pointer to that stored file.
The base URL for adding an entry to the ui-component-registry follows this pattern:
https://api.<tenant>.<cluster>.<domain>/ui-component-registry/add
Example:
https://api.<tenant>.<cluster>.<domain>/ui-component-registry/add
The registry payload for the indes.js file describes the following metadata and looks like this:
- The unique component identifier
- The component name and version
- The URL pointing to the
index.jsfile stored in the file-storage-service
{
  "id": "@olive/mycard@0.0.1/index.js",
  "name": "my-card",
  "version": "0.0.1",
  "config": {
    "url": "https://api.<tenant>.<cluster>.<domain>/file-storage-service/get/my-card-ami@0.0.1/index.js"
  }
}
idcorresponds to thekeyreturned by the upload endpoint
The following command registers the index.js file in the ui-component-registry:
For Linux (e.g. Ubuntu WSL)
cat <<'EOF' | curl -X POST "https://api.<tenant>.<cluster>.<domain>/ui-component-registry/add" \
  -H "Content-Type: application/json" \
  --data-binary @-
{
  "id": "@olive/mycard@0.0.1/index.js",
  "name": "my-card",
  "version": "0.0.1",
  "config": {
    "url": "https://api.<tenant>.<cluster>.<domain>/file-storage-service/get/my-card@0.0.1/index.js"
  }
}
EOF
For Powershell Windows
@'
{
  "id": "@olive/mycard@0.0.1/index.js",
  "name": "my-card",
  "version": "0.0.1",
  "config": {
    "url": "https://api.<tenant>.<cluster>.<domain>/file-storage-service/get/my-card@0.0.1/index.js"
  }
}
'@ | curl.exe -X POST "https://api.<tenant>.<cluster>.<domain>/ui-component-registry/add" `
  -H "Content-Type: application/json" `
  --data-binary @('@"-"')
If you use an API tool such as Bruno instead of the provided curl commands, ensure that all values you pass follow the structure described above. In particular, the URL structure must match the curl examples exactly — any mismatch may cause issues.
If the command completes without returning an error message, the UI component has been successfully registered in the ui-component-registry.
The component can now be referenced by ClientComponent instances using the registered identifier and version.
Create the ClientComponent Instance
Now we need a ClientComponent instance to reference our ui-component. The ui-component code itself cannot be connected directly — the ClientComponent acts as the bridge between the UI component and the connectivity layer.
To create a ClientComponent, open the Connectivity Editor application and create a new entry:
https://repo.<tenant>.<cluster>.<domain>
When creating a ClientComponent that references a UI component (pilet), we use the following base structure:
{
  "id": "<client-component-name>",
  "version": "0.0.1",
  "tags": [],
  "name": "<client-component-name>",
  "type": "clientComponent",
  "clientComponent": {
    "clientScriptDatapoint": {
      "id": "<client-component-name>",
      "version": "0.0.1",
      "type": "clientScriptDatapoint",
      "clientScriptDatapoint": {
        "type": "pilet",
        "pilet": {
          "componentName": "<client-component-name>"
        }
      }
    },
    "datapoints": [
      "<datapoint-id-1>",
      "<datapoint-id-2>"
    ]
  }
}
id/name
The unique identifier of the ClientComponent. You can choose any name, but it should match the UI component it represents.version
Version of the ClientComponent.clientScriptDatapoint
Defines how the UI component should be loaded. Specifically, in this example, as a pilet, which is the term used for a UI component in the Piral microfrontend framework.componentName
Must match the name used when registering the UI component in the UI Component Registry.datapoints
A list of all datapoints (events) emitted or consumed by the UI component.
Please note that the editor’s syntax validation does not recognize the ClientComponent, Microfrontend, Event, or other UI related types yet, as these classes are currently in a prototype state.
The following example shows a ClientComponent referencing the UI component my-card:
{
  "id": "my-card",
  "version": "0.0.1",
  "tags": [],
  "name": "my-card",
  "type": "clientComponent",
  "clientComponent": {
    "clientScriptDatapoint": {
      "id": "my-card",
      "version": "0.0.1",
      "type": "clientScriptDatapoint",
      "clientScriptDatapoint": {
        "type": "pilet",
        "pilet": {
          "componentName": "my-card"
        }
      }
    },
    "datapoints": []
  }
}
At this point, the ClientComponent is correctly linked to the UI component, but it does not yet expose any events yet.
A crucial part of the ClientComponent configuration is the datapoints array.
Datapoints are used to describe events that a UI component emits.
Each event that should be exposed to the connectivity layer must have its own datapoint entry in the Connectivity Editor.
The UI component my-card emits an event in the following code segment:
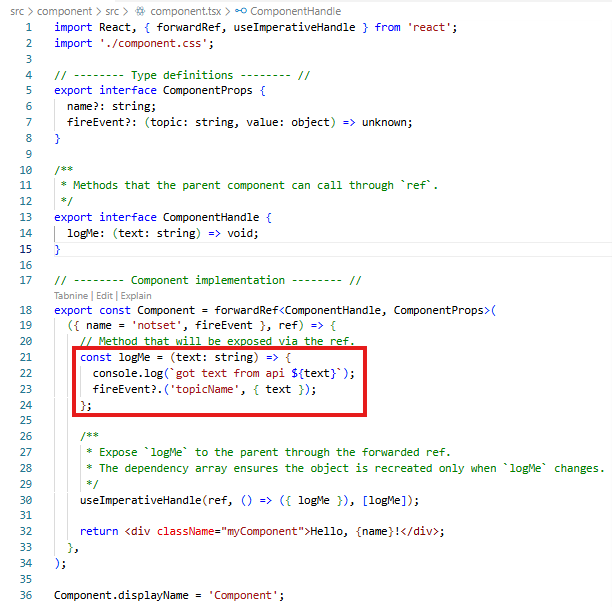
Event details:
- Event topic:
topicName - When triggered: When
logMe(text)is called - Payload:
{ text: string }
This event needs to be registered as a datapoint so it can be referenced in connectivity.
Use the following base structure when registering an event datapoint:
{
  "id": "<event-name>",
  "type": "datapoint",
  "version": "1.0.0",
  "displayName": "<event-name>",
  "tags": [],
  "description": "",
  "deprecated": false,
  "datapoint": {
    "type": "event",
    "event": {
      "topic": "<event-name>"
    }
  },
  "owner": ""
}
- The value of
event.topicmust exactly match the topic used infireEvent(...) - The datapoint describes the event itself, not the payload schema
- Payload details can be documented in the
descriptionfield
For the event emitted by my-card, the datapoint looks like this:
{
  "id": "topicName",
  "type": "datapoint",
  "version": "1.0.0",
  "displayName": "topicName",
  "tags": [
    "my-card"
  ],
  "description": "Emitted when logMe(text) is called. Payload: { text: string }",
  "deprecated": false,
  "datapoint": {
    "type": "event",
    "event": {
      "topic": "topicName"
    }
  },
  "owner": ""
}
Once the datapoint is registered, reference it in the ClientComponent definition:
"datapoints": [
  "topicName"
]
The complete flow should work as followed:
- The UI component emits the event
- The event is registered as a datapoint
- The ClientComponent references the datapoint
- The event can now be connected and consumed by other instances
Create a Microfrontend Instance
A MicroFrontend defines both the layout and the behavior of a composed UI. It specifies which ClientComponents are rendered and how they are positioned, and it also defines the connectivity between them. This includes wiring client-side events to processing logic, such as triggering a backend request in response to a button click and propagating the resulting data back into a ClientComponent.
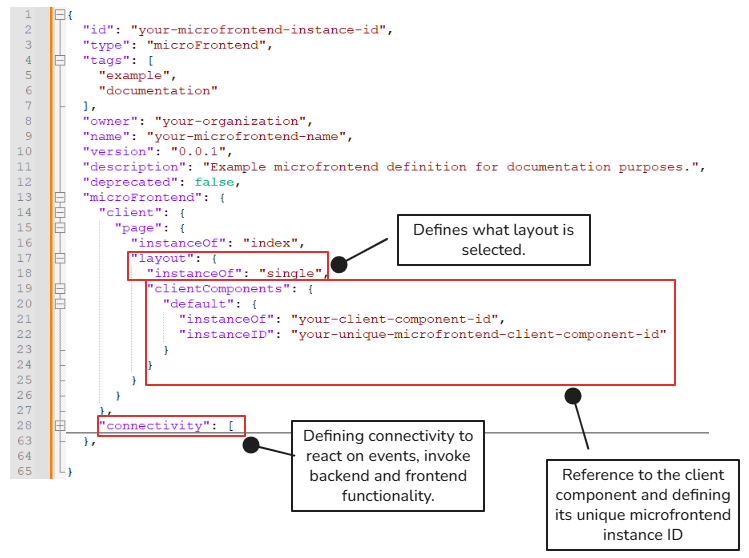
At the current stage, the supported layouts are single, border, vbox, and hbox. For now, this documentation covers only the single layout.
In a single layout, exactly one ClientComponent can be positioned and rendered. The identifier of the ClientComponent entry must reference the ID of a ClientComponent that has been registered previously.
For instanceOf, specify the ID of the ClientComponent that should be rendered.
For instanceID, provide a unique identifier for the ClientComponent instance within the MicroFrontend. In other layouts (for example, border), multiple instances of the same ClientComponent may be used; in such cases, each instance must have its own unique instanceID. The instanceID is used to uniquely reference ClientScriptDatapoints and Events in the connectivity section.
The connectivity section defines which events trigger a sequence of actions. Multiple events and corresponding sequences can be defined. At present, the connectivity model supports only connector instances - sequential execution; control-flow constructs such as branching or looping are not supported.
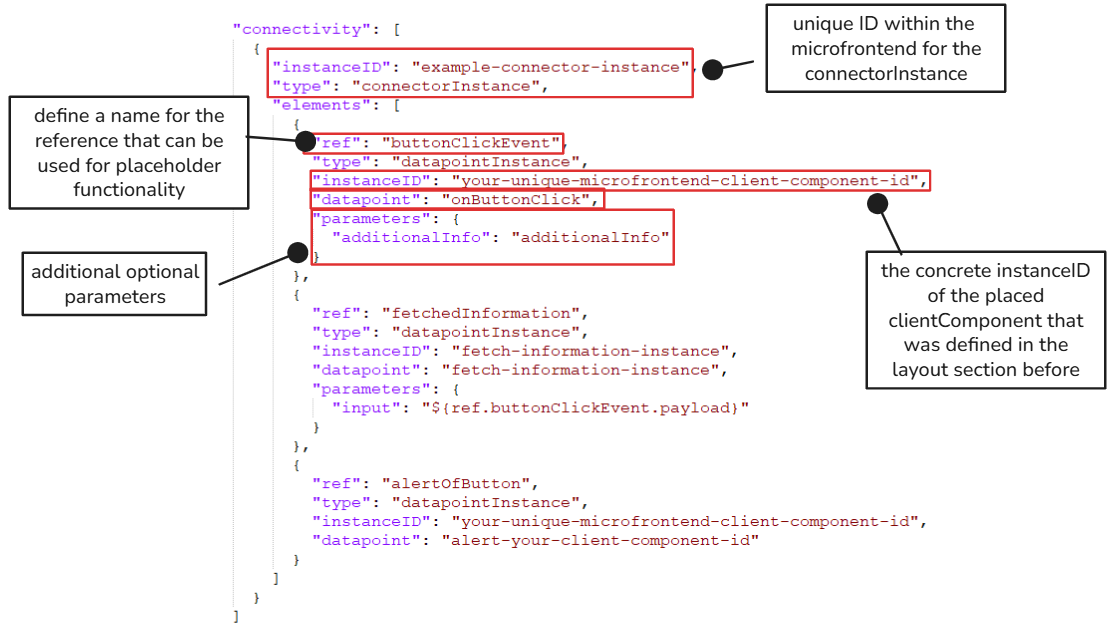
Each entry in the connectivity array represents a connectorInstance. A connectorInstance defines a sequential flow of actions that is triggered by one or more events.
instanceID
Each connectorInstance must have aninstanceIDthat is unique within the MicroFrontend definition.
This identifier is used internally to reference and manage the connector instance.type
Must be set toconnectorInstance.
The elements array defines the ordered list of connectivity elements executed by the connector.
Elements are executed strictly in sequence, from top to bottom.
Entries in the element section have these common fields:
ref
Defines a symbolic reference name for the element.
This reference can be used in later elements to access outputs or payload data via placeholder expressions (e.g.${ref.buttonClickEvent.payload}).instanceID
The unique identifier of the datapoint owner. This is particularly relevant forClientScriptDatapointinstances, as it specifies the exact ClientComponent instance to which the datapoint belongs. Since a MicroFrontend may contain multiple instances of the same ClientComponent definition, this identifier is required to unambiguously reference the intended component instance.datapoint
The ID of the datapoint to use. If for example an HTTP datapoint instance is referenced, the field instanceID and the field datapoint can have the same entry since there is no other "owner".parameters(optional)
Additional parameters passed to the datapoint. Parameters may reference outputs of previous elements using therefmechanism.
To continue the example from the previous sections, we will now create a microfrontend that displays the my-card UI component.
This is done by creating a new microfrontend entry in the Connectivity Editor that references the ClientComponent we created earlier.
Open the Connectivity Editor:
https://repo.<tenant>.<cluster>.<domain>
Based on the microfrontend configuration structure shown earlier in this chapter, create a new simple microfrontend entry that references the my-card ClientComponent.
{
  "id": "my-card-app",
  "name": "my-card-frontend-application",
  "type": "microFrontend",
  "version": "0.0.1",
  "tags": [],
  "microFrontend": {
    "client": {
      "page": {
        "instanceOf": "index",
        "layout": {
          "instanceOf": "single",
          "clientComponents": {
            "default": {
              "id": "my-card",
              "instanceOf": "my-card",
              "instanceID": "my-card"
            }
          }
        }
      }
    }
  }
}
-
The values of
id,instanceOf, andinstanceIDunderclientComponentsmust match the ClientComponent ID that was created earlier. -
The microfrontend
idis especially important:- It defines the URL under which the application can be opened
- This will be explained in more detail in the next chapter
-
The microfrontend
iddoes not have to match thename, although using similar values is recommended for clarity.
Open the Microfrontend
Once the microfrontend configuration has been created, it can be opened directly in the browser using the following URL:
https://app.<tenant>.<cluster>.<domain>/?config=<microfrontend-id>
The value of the config query parameter must match the microfrontend id defined in the Connectivity Editor.
If all configurations are correct, the microfrontend will load successfully and display the same UI that was visible during local development.

You may notice that the displayed text now shows the value notset.
This is expected behavior. During local development, values such as "World" or "Olive" were passed dynamically from the local App.tsx file. That file is only used in the local development setup and is not part of the deployed microfrontend.
We describe in the next section how you can provide this configuration in your Microfrontend declaration.
Configure the ClientComponent Instance
In the business logic of the UI component (component.tsx) the ComponentProps are defined like this:

The name of this property definition is used to render the text:

Within the microfrontend definition, the declaration of the ClientComponent instance allows you to pass a config object to set the name property:
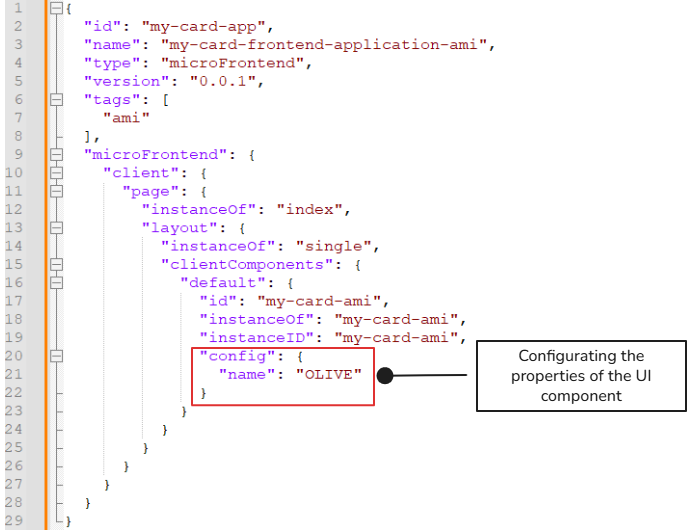
Example Microfrontend Instance with ClientComponent Config
{
  "id": "my-card-app",
  "name": "my-card-frontend-application",
  "type": "microFrontend",
  "version": "0.0.1",
  "tags": [],
  "microFrontend": {
    "client": {
      "page": {
        "instanceOf": "index",
        "layout": {
          "instanceOf": "single",
          "clientComponents": {
            "default": {
              "id": "my-card",
              "instanceOf": "my-card",
              "instanceID": "my-card",
              "config": {
                "name": "OLIVE"
              }
            }
          }
        }
      }
    }
  }
}
After refreshing the URL of the microfrontend interpreter that renders the microfrontend instance, you will see that the property has been applied:

Move the Component to a Production Deployment
Everything up to here happens in a development deployment: you build the UI component, deploy it there with yarn deploy, create the ClientComponent and MicroFrontend instances, and test the result end to end.
Production is reached with an OLIVE Connectivity Bundle (OCB), not by running the deployment script against it.
Why not deploy straight to production
The deployment script uploads into the file-storage-service and registers the component in the ui-component-registry. In an authenticated deployment both are administrative operations — the upload writes into the core file category, and deploying or changing a pilet requires the admin role, because a pilet runs inside an authenticated user's browser session.
Going through a bundle also keeps the component and the connectivity that uses it together: the ClientComponent and MicroFrontend instances you created are connectivity content, and a component that arrives without them is only half the solution.
The steps
- Finish testing in the development deployment. The component renders, the microfrontend behaves, and the connectivity behind it works.
- Run the security review. Your Security Responsibilities as a UI Component Developer — someone other than the author reads the code, and the pre-handover checklist is complete.
- Export an OCB from the development deployment. The bundle carries the connectivity elements and the microfrontend components, so the ClientComponent and MicroFrontend instances travel with the component code. See How to Package a Use Case Solution.
- Hand it to the Tenant Admin of the target tenant. Only a user with the admin role can import a bundle into a production deployment, and only an admin can deploy a pilet there.
- Import and verify. On a name collision the importer is shown the collisions and decides whether to overwrite or keep what is there. After the import, open the microfrontend in the production deployment and check it renders as it did in development.
An OCB contains connectivity elements and microfrontend components. It does not carry deployment configuration: deploy.config.json, bearer tokens and the apiBaseUrl stay with your project and are never part of a bundle. Anything the component needs from its environment — an endpoint, a credential — is configured in the target deployment, not shipped inside the bundle.
Pointing deploy.config.json at a production URL with an admin bearer token will technically work, and it bypasses the review and the traceability that the bundle route provides — a component then appears in production with no record of what was tested or approved. If your organization needs a direct path for hotfixes, agree it with your Tenant Admin rather than improvising it.
Multi UI-Component Example
The following example arranges two text fields and a button within a horizontal (hbox) layout.
In this scenario, user input is entered into the first text field. When the button is pressed, a datapoint is executed using this input, and the resulting output is displayed in the second text field.
Application on loading:

Application after entering input text and pressing the "Click me" button:

Example Setup & Deployment
For this scenario, two UI component code projects are already available and can be used to set up and deploy a button and a text field:
You can find them in the latest development package as "UI Component Button Project" and "UI Component Text Field Project".
For each project, perform the following steps:
- Configure the
deploy.config.jsonfile. - Run
yarn installin the root directory of the project. - Run
yarn setup. - Followed by:
yarn deploy.
Once both projects have been deployed, import the OLIVE Connectivity Bundle (OCB) into your development deployment of the OLIVE platform using the Connectivity Editor import function:
After completing these steps, you can open the microfrontend using the following URL pattern:
https://app.<tenant>.<cluster>.<domain>/?config=invoke-connectivity-app
Example:
for example https://app.acme.prod.yourdomain.com/?config=invoke-connectivity-app
Events and Datapoints
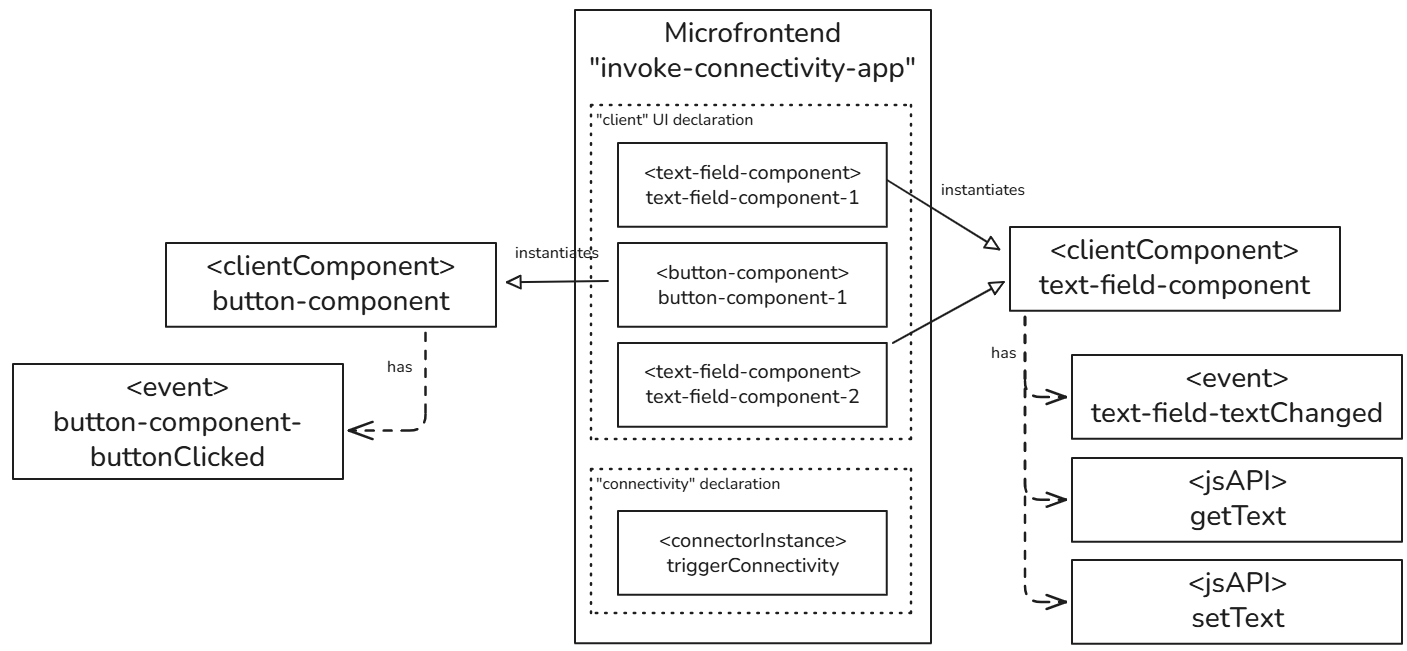
The OLIVE Connectivity Bundle (OCB) creates the following instances:
-
Microfrontend:
invoke-connectivity-app -
ClientComponent:
button-component- Event:
buttonClicked
- Event:
-
ClientComponent:
text-field-component- jsAPI:
jsAPI-getText - jsAPI:
jsAPI-setText - Event: text-field-textChanged
- jsAPI:
-
Datapoint:
echo-test-api
The diagram below illustrates how these instances reference and interact with each other.
For clarity, the diagram does not include the details of the connectorInstance associated with the microfrontend invoke-connectivity-app. This aspect is addressed in more detail in a subsequent section.
In addition to these instances, the OLIVE Connectivity Bundle (OCB) includes multiple variants of the microfrontend invoke-connectivity-app-[LAYOUT], each demonstrating a different layouting mechanism.
The OLIVE Connectivity Bundle (OCB) also contains a single HTTP datapoint, echo-test-api.
Layout Structure
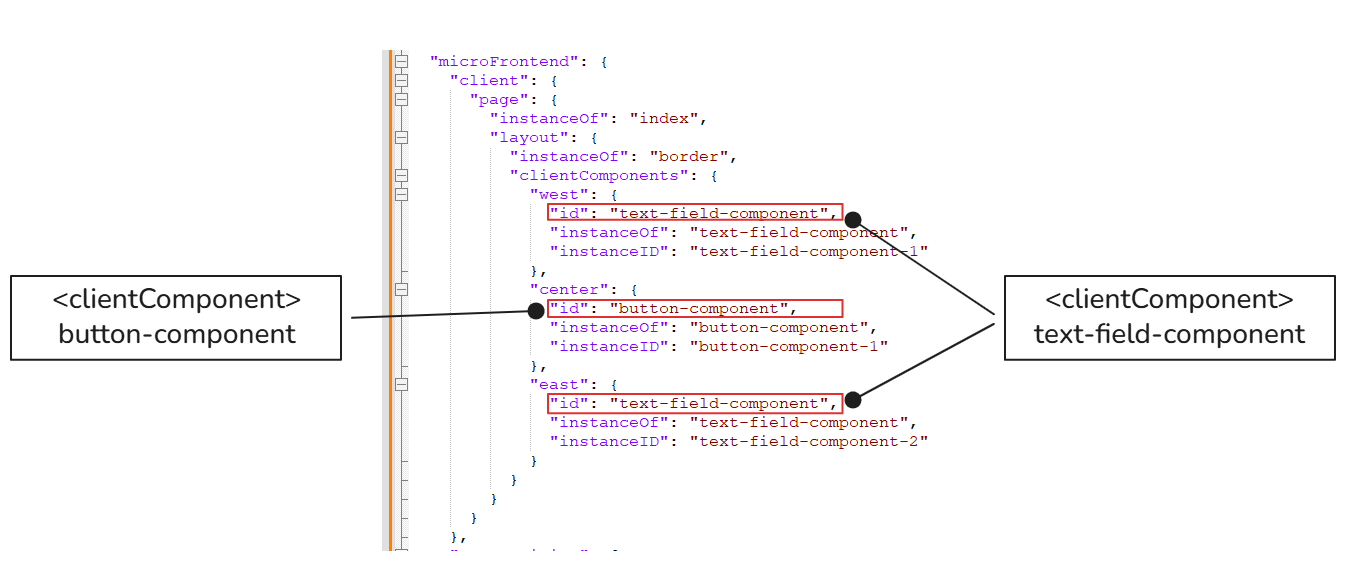
Next we inspect the structure of the microfrontend definition that uses the hbox layout:
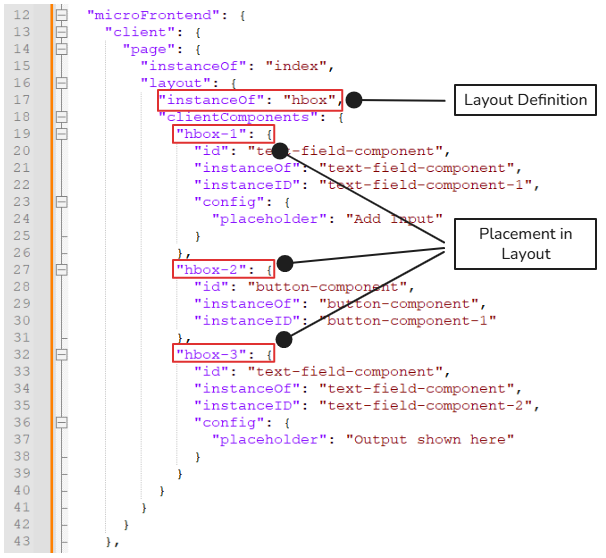
The vbox layout is very similar, the layout name is called "vbox" and the prefix of the item keys is "vbox-" followed by a number.
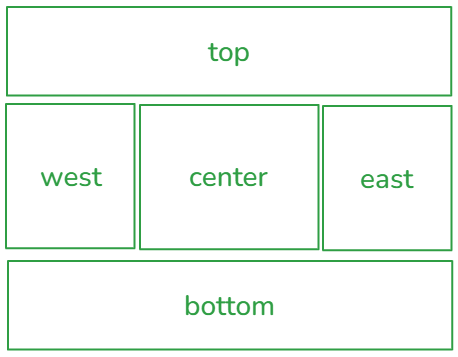
In the OLIVE platform version 1.1.0 also border layout is supported. The item keys that can be used are:
- top
- west
- center
- east
- bottom
And are arranged like this:
Connectivity Structure
Next, we take a closer look at how connectivity is implemented within the microfrontend.
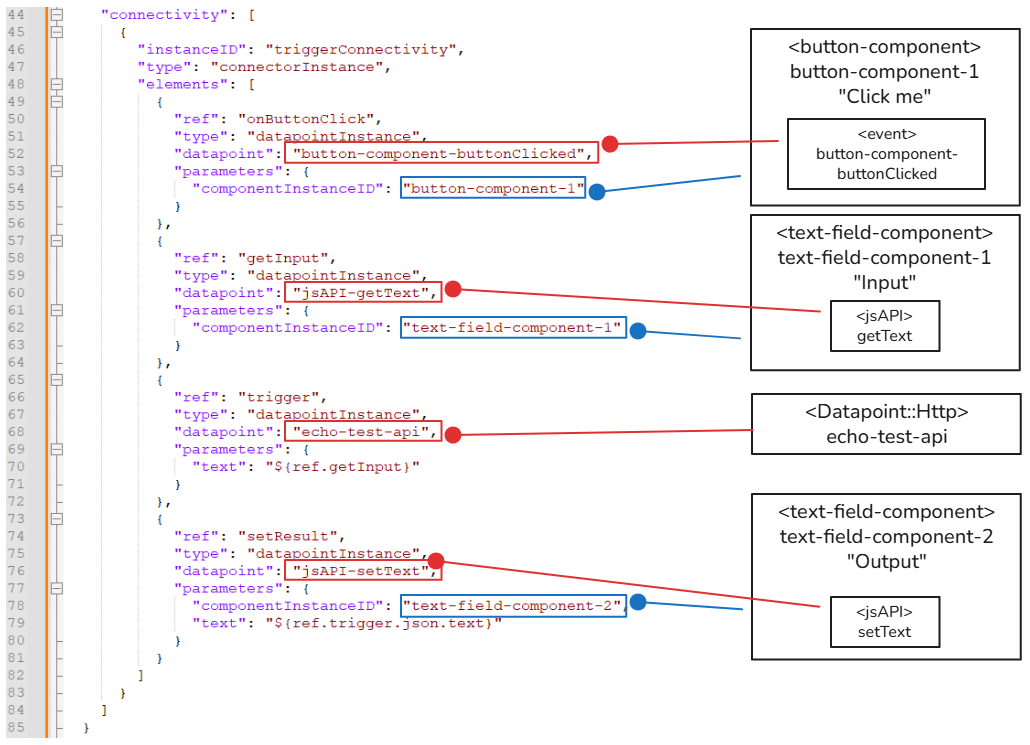
The first datapoint configured in the connector is the event button-component-buttonClicked. When the button is clicked, this event triggers the execution of the connector.
The next step in the execution flow is the invocation of the client datapoint jsAPI-getText on the input text field text-field-component-1, which retrieves the user-provided value.
Subsequently, the HTTP datapoint echo-test-api is invoked, receiving the extracted text value as an input parameter.
Finally, a portion of the response returned by echo-test-api is passed to the client datapoint jsAPI-setText of the output text field text-field-component-2, where the result is displayed.
Note: It is also possible to invoke another connector or a workflow.