4.5 How to Customize and Parametrize Connectivity
So far, we have created a number of different use cases in OLIVE. We learned how to connect external services, how to orchestrate data flows, and how to work with placeholders and authentication.
Up until this point, however, the scenarios we built are not easily reusable on a broader scale. Even small changes requested by a customer would often mean duplicating most of the setup, leaving us with little flexibility.
In addition, working directly with raw JSON structures is not user-friendly and can easily lead to errors, especially for roles that are less technical.
To address these challenges, we now move on to customizing and parameterizing connectivity. This approach makes scenarios easier to modify, easier to reuse, and more user-friendly across different tenants and contexts.
Example Scenario
In this example, we will look at how to apply customizations to a videoconference collaboration tool in order to automatically generate models in ADONIS.
This will include both the generation of a template and its usage in practice.
What We Learn
- How to generate a reusable template from connectivity
- How to apply and instantiate a template
Templates: General Idea
To create a new parameterizable scenario, let’s revisit our initial “Hello World” example, where we created a summary for an EU regulation.
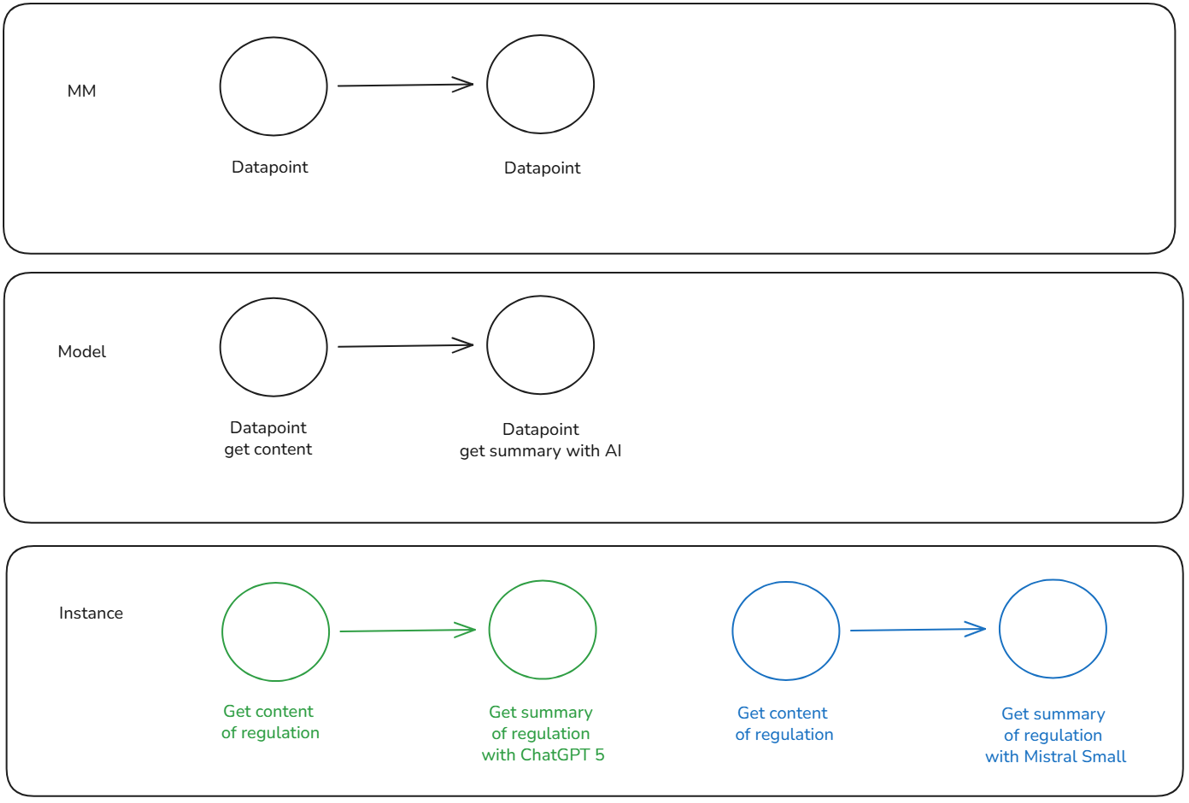
Some customers may be perfectly happy with this setup as-is. However, others may prefer not to use ChatGPT and instead rely on a European-based model such as Mistral Small.
Looking at this from the bottom up:
-
We see two different concrete use cases: one with ChatGPT 5 and one with Mistral Small.
-
From a more abstract perspective, however, both cases are simply two datapoints:
- GET regulation
- GET summary using AI
… connected through a connector.
Taking it one step further, at the metamodel (MM) level, it’s even simpler: two datapoints connected.
This gives us three layers:
- Instances: the concrete cases with all parameters and credentials.
- Model: the abstract definition of the use case structure.
- Metamodel: the conceptual framework defined in OLIVE.
Up to now, we created instances in the connectivity editor and discussed the metamodel during the concept phase. What was missing is the model layer — a reusable, more generalized representation of the scenario.
This is where Templates in OLIVE come into play. Templates enable us to build parameterized scenarios that can be reused and adapted across different tenants, reducing duplication and improving flexibility.
Creating and Instantiating Templates
The Template approach in OLIVE involves two steps when creating a use case for a tenant:
-
Create a generic, parameterized use case (Template).
- This defines the general structure and placeholders, abstracting away specifics like credentials or model selection.
-
Instantiate the template for a tenant-specific use case.
- Here, the abstract model is applied and filled with tenant-specific details, such as the choice between ChatGPT or Mistral.
It is important to note:
- These two steps are fully independent of each other.
- They can be performed by different people — even belonging to different roles (e.g., Scenario Developer vs. Tenant Admin).
- A template may be created now but instantiated months later when a tenant requires it.
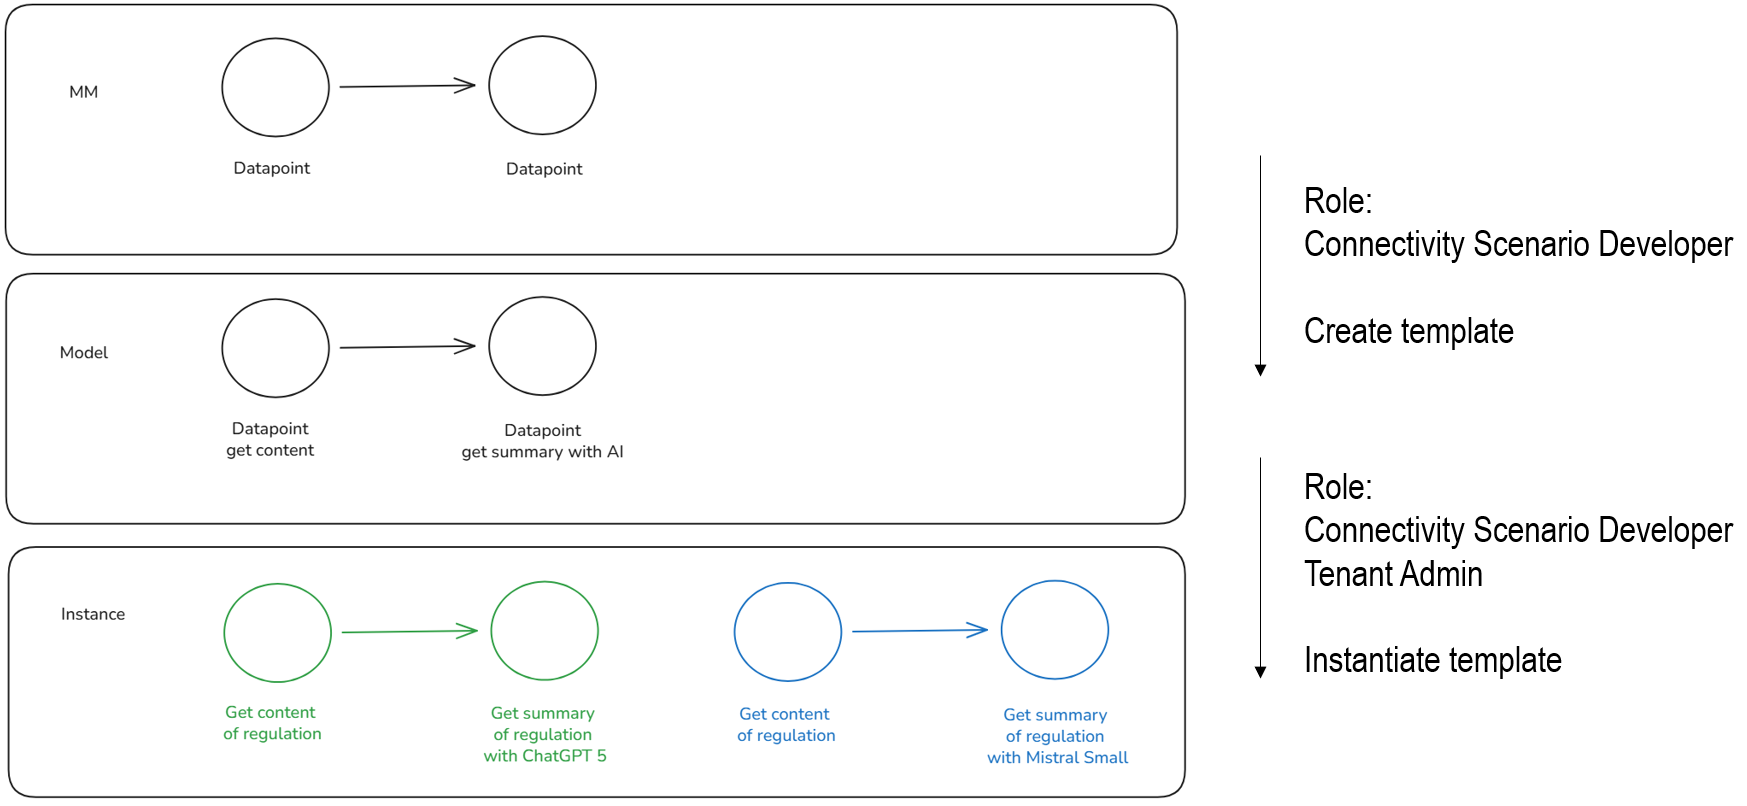
This separation of responsibilities ensures flexibility, scalability, and a cleaner workflow for managing multiple tenants with different requirements.
Internal Structure of a Template
This image illustrates the internal structure of a template, which helps us understand what is required to create a reusable scenario:
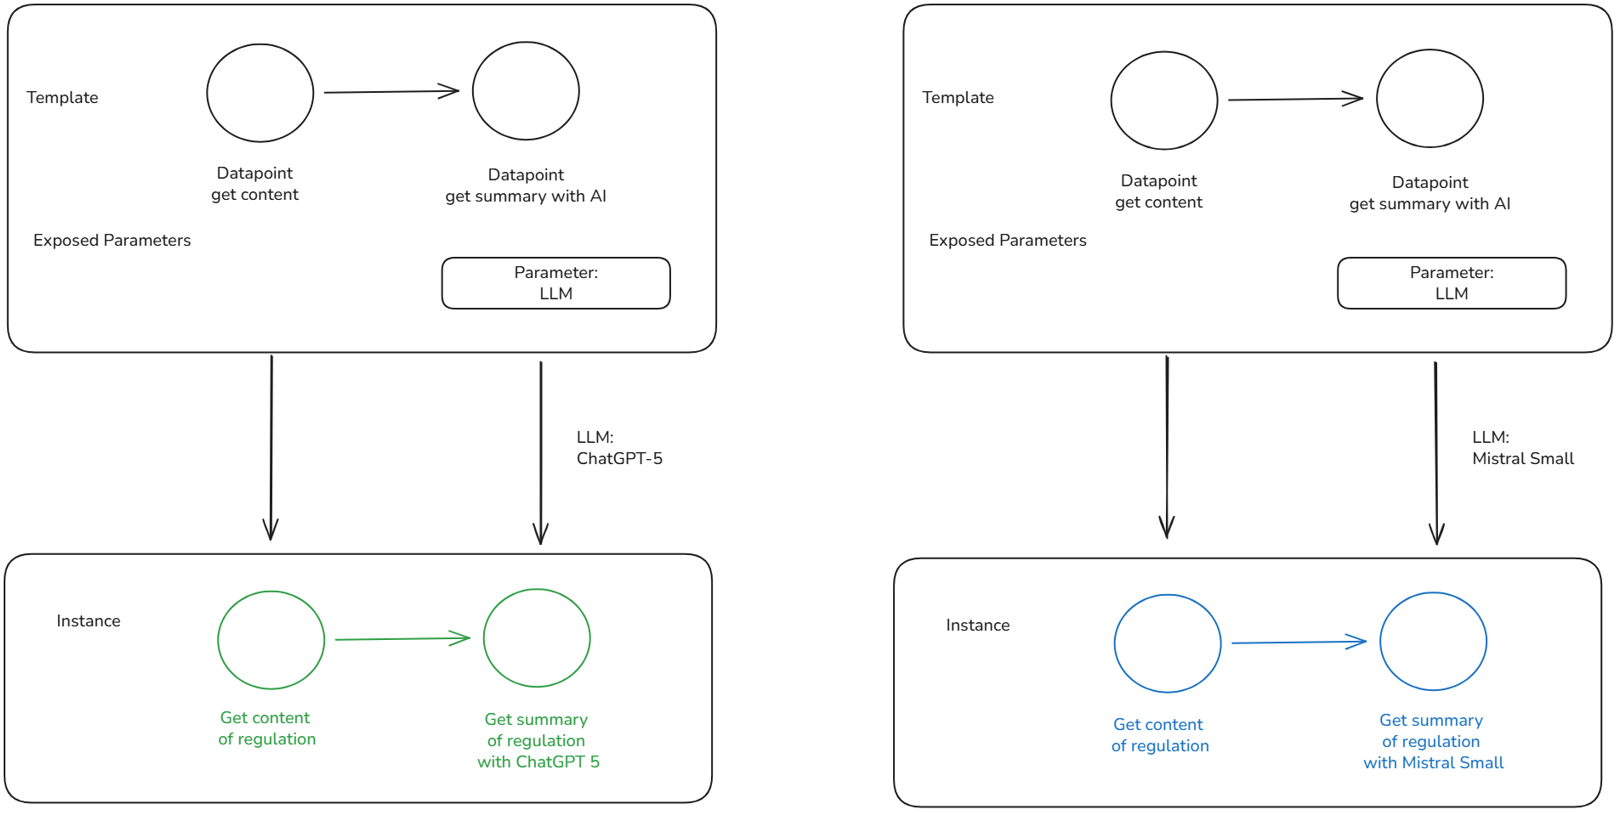
At the top, both sides depict the same template:
- It contains the generic datapoints and the connector.
- It also exposes a parameter.
- In this example, the exposed parameter defines which LLM (Large Language Model) should be used.
During the instantiation step, this parameter is filled with a concrete value for the tenant-specific use case:
- For one tenant, the parameter is set to ChatGPT 5, resulting in a use case where regulations are summarized using ChatGPT.
- For another tenant, the parameter is set to Mistral Small, resulting in a use case where regulations are summarized using Mistral.
This approach allows us to define a single reusable scenario (the template), which can be instantiated in different ways to satisfy the needs of different tenants.
By exposing and filling parameters in this way, we achieve flexibility, reusability, and scalability while minimizing redundant setup effort.
Templates in the Default OLIVE Scenarios
To make the concept of templates more tangible, let’s look at some parameters typically used in the default OLIVE example scenarios.
As shown, credentials and URLs to customer environments are among the most common parameters.
- These values are always unique for each instantiated use case.
However, templates also allow for more complex customization:
-
Collaborative Modelling
- Provide the URL to ADONIS
- Select the LLM
- Provide credentials
-
AWS Data Retrieval
- Use a different provider than AWS
- Provide credentials
- Create mapping from AWS to ADOIT metamodel
This demonstrates that parameters are not limited to technical values (like credentials or endpoints). They may also cover structural and functional aspects of a use case, such as:
- Mapping properties to attributes in the metamodel,
- Defining which classes are included, or
- Selecting which provider should be used.
By supporting all these options, OLIVE templates provide both flexibility and scalability, ensuring that scenarios can be efficiently adapted to different tenant environments.
Showcase
To illustrate how template instantiation works in practice, let’s walk through a simple example.
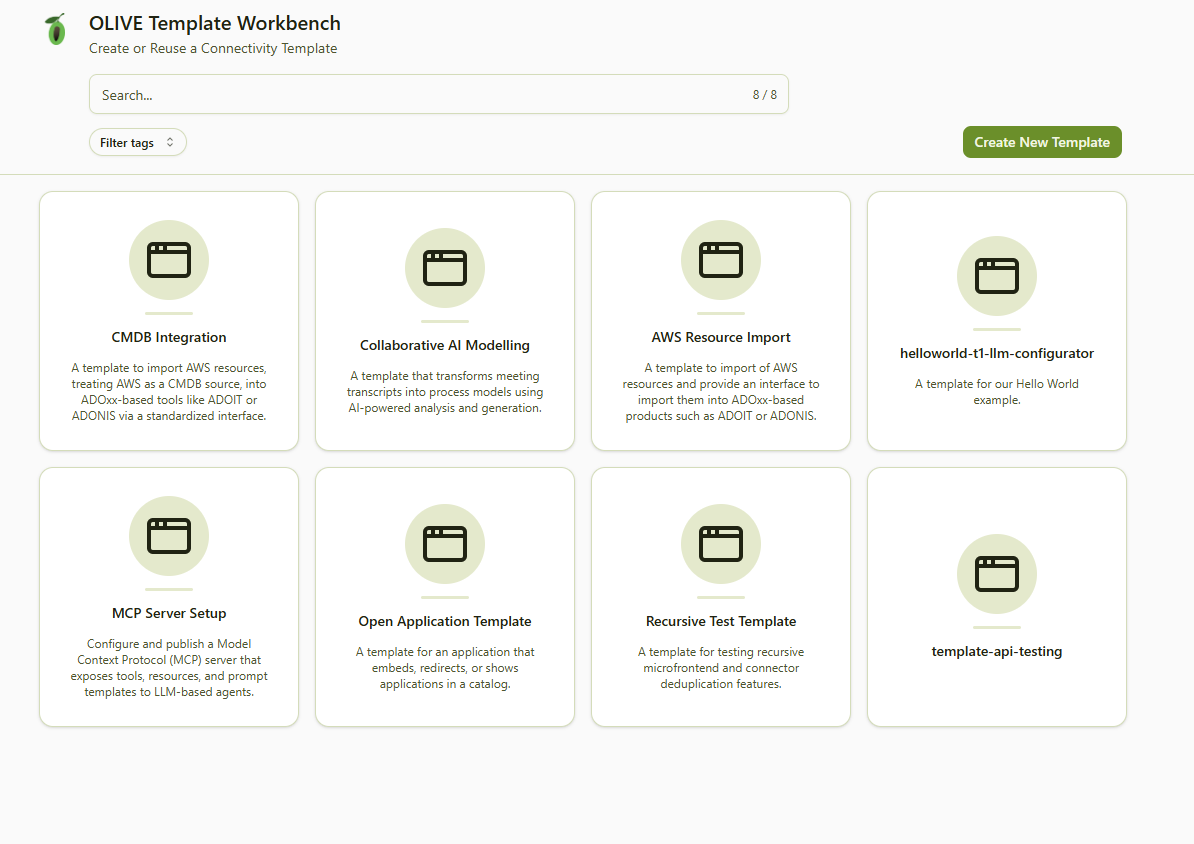
Step 1: Access the Templates Overview
- Open the Templates Overview Application in your OLIVE tenant.
- Use the following link, replacing
<tenant>.<cluster>.<domain>with your actual tenant name:
https://app.<tenant>.<cluster>.<domain>/?config=olive-template-dashboard
Step 2: Browse Available Templates
- You will see a list of all templates created.
- As an example, select the Collaborative AI Modelling template.
Step 3: Explore the Template Editor
- The editor allows you to see the parameters that need to be filled (e.g., model selection, credentials, prompts).
- For this exercise, you don’t need to complete all details. Instead, explore how templates are structured and what information might typically be required.
Step 4: Instantiate the Template
-
Once all parameters are provided, confirm the setup to instantiate the use case.
-
This creates:
- A tenant-specific application accessible via link.
- The corresponding connectable elements in the connectivity editor.
This process shows how easy it is to go from a reusable template to a tenant-specific application, while keeping flexibility for different environments and use cases.
Creating Templates
Before building a template, it’s important to step back and follow a basic methodology. Similar to creating a use case, templates also require thoughtful design before implementation.
Key Considerations
1. Idea
- Ask whether a generic, reusable template is actually needed.
- If the scenario is very tenant-specific, a simple one-off use case might be more efficient.
- Templates are valuable when you expect reuse across multiple tenants.
2. Concept
- Define how generic the use case should be.
- Decide how many choices the user should have during instantiation.
- Clarify whether you only expose technically necessary parameters (e.g., credentials), or also functional variations (e.g., choice of LLM provider).
3. Concept for Technical Realization
-
Decide exactly which parameters should be available.
-
Structure the instantiation process:
- How many steps should there be?
- Should parameters be grouped for clarity?
- How do you avoid overwhelming users with too many options?
4. Realization
- Translate the concept into a syntactically correct template definition.
- Ensure the parameter display and form structure are clear for the end user.
5. Deploy
- Make the template available for use.
Best Practice
- Start concrete, then generalize:
It’s often easier to first create a concrete, non-parameterized use case in your sandbox. - Validate and debug the use case in isolation.
- Once it works reliably, extract the generic parts into a template.
This avoids common pitfalls where errors are harder to trace — for example, whether an issue lies in the connectivity itself, in the instantiation process, or in incorrect parameter values.
Metamodel
To understand templates from a metamodel perspective, it helps to break them down into their structural elements. Templates are not just flat definitions; they follow a hierarchy of classes and properties that define how scenarios are parameterized and instantiated.
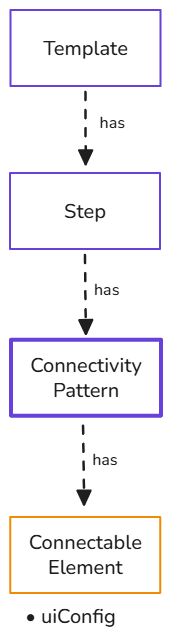
Hierarchy Overview
-
Template
- Represents the definition of a single, reusable use case.
- Provides the overall structure for reuse across tenants.
-
Step
- A template contains one or more steps.
- When instantiating a use case, the user progresses through these steps sequentially, filling out parameters step by step.
-
Connectivity Pattern
- Each step can include one or more connectivity patterns.
- A connectivity pattern groups related connectable elements.
-
Connectable Element
- Connectable elements are a superset of datapoints and connectors.
- They can optionally contain a uiConfig property, which defines parameters the user can provide during instantiation.
-
uiConfig
-
Specifies tenant-specific configuration needs (e.g., URLs, access credentials).
-
Ensures the generic template can be customized for a tenant’s environment.
-
Each uiConfig can define multiple parameters.
-
Parameters can have additional settings, such as:
- Labels to be shown
- Control types (e.g., dropdown, text input, checkbox)
-
Key Takeaway
This structure ensures that templates in OLIVE are modular, reusable, and adaptable. The step-by-step approach simplifies the instantiation process for users, while the parameterization provides flexibility for tenant-specific customization.
Design (Hello-World scenario)
This section maps the “Hello World” regulation-summary scenario into an OLIVE template design.
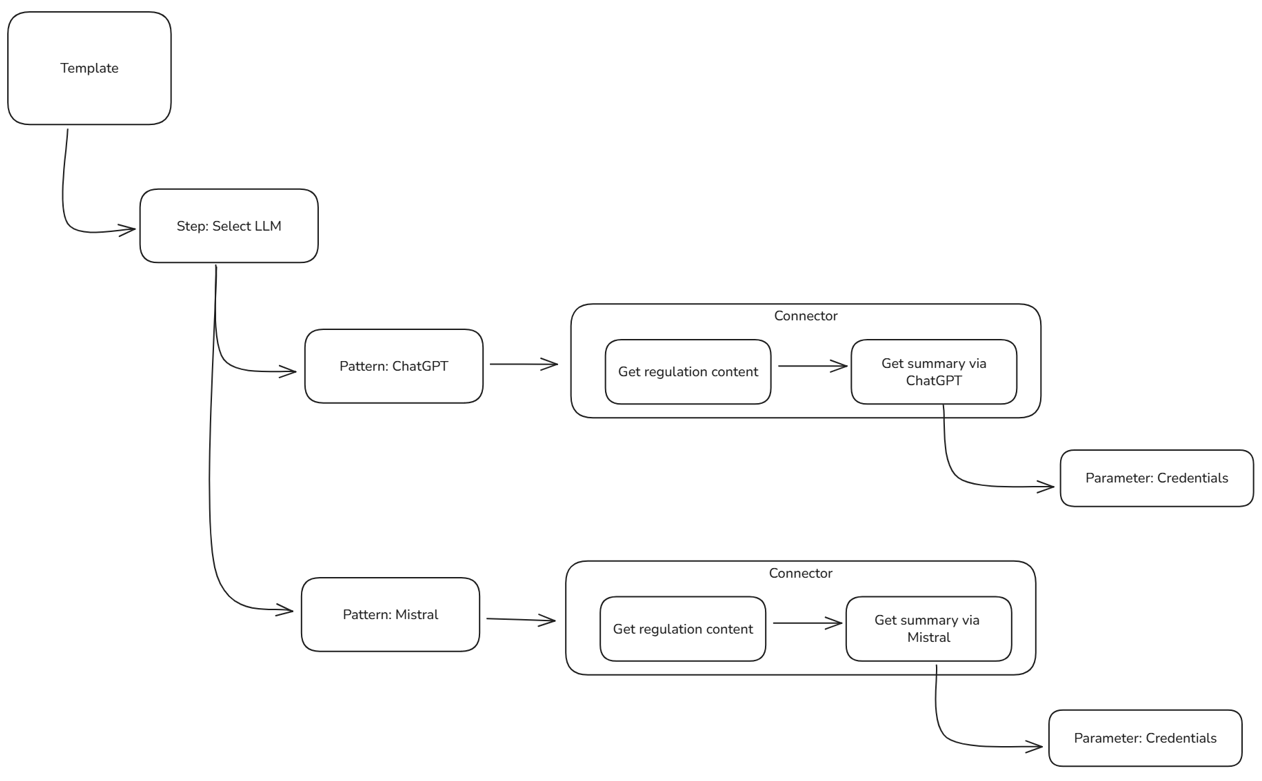
1. Template root
- Template: represents the reusable “Summarize EU regulation” use case.
- Goal: keep the design lean and expose only what truly needs to vary per tenant.
2. Step: Select LLM
-
We use one step inside the template to avoid overwhelming the user.
-
The step lets the user choose the Large Language Model (LLM) used to produce the summary:
- ChatGPT
- Mistral
3. Patterns inside the step
To support either LLM cleanly, the step contains two connectivity patterns:
-
Pattern: ChatGPT
-
Connector: orchestrates the flow
Get regulation content → Get summary via ChatGPT -
Datapoints:
- Get regulation content (reused)
- Get summary via ChatGPT (ChatGPT-specific HTTP call)
-
uiConfig / Parameters:
- Credentials (exposed for instantiation)
-
-
Pattern: Mistral
-
Connector: orchestrates the flow
Get regulation content → Get summary via Mistral -
Datapoints:
- Get regulation content (reused)
- Get summary via Mistral (Mistral-specific HTTP call)
-
uiConfig / Parameters:
- Credentials (exposed for instantiation)
-
Why two patterns?
Although the “get regulation content” datapoint is identical, the LLM requests differ (payload, headers, endpoints). Keeping separate connectors per LLM avoids brittle conditional logic and keeps each path clear and testable.
4. Exposed parameters
- LLM selection (choice between patterns; realized as the step’s decision)
- Access credentials for the selected LLM (modeled as parameters in the LLM datapoint’s
uiConfig)
5. Result
-
A single template can be instantiated in two flavors:
- ChatGPT variant
- Mistral variant
-
Each tenant selects the LLM and provides its credentials at instantiation time — no duplication of design or repository content.
Creating Templates – Hands-On
Now that we’ve covered the concepts and design, let’s move into the hands-on implementation.
We’ll build the parameterized template step by step.
Step 1: Open the connectivity editor
In a development deployment there is a single sandbox, so there is nothing to select — everything you create lands in it. In a production deployment you work in the sandbox of the tenant you are signed in to.
Step 2: Re-create Datapoints & Connectors
-
Define the necessary datapoints, such as:
- Get Regulation Content
- Summarize with ChatGPT
- Summarize with Mistral
-
Create connectors that link these datapoints appropriately.
Step 3: Make credentials configurable
- Expose access tokens or API keys as configurable parameters inside the datapoints.
- This ensures that each tenant can provide their own credentials securely during instantiation.
Step 4: Build Connectivity Patterns & Template
- Group datapoints and connectors into connectivity patterns (e.g., one for ChatGPT, one for Mistral).
- Wrap these patterns into a template that allows the tenant to choose the LLM during instantiation.
With this setup in place, we can proceed to instantiate the template in the sandbox and test the generated use case.
Defining Datapoints
To enable our parameterized Hello World use case, we need to create the datapoints that will call the respective LLM APIs (ChatGPT and Mistral). These datapoints are created, so they can later be reused in templates and instantiated for each tenant.
Example Datapoints
Below you can see two example datapoint definitions in JSON.
These can be directly copied into the connectivity editor:
ChatGPT Datapoint
{
  "id": "helloworld-dp3-hello-world-prompt-chatgpt",
  "type": "datapoint",
  "version": "0.0.1",
  "name": "helloworld-dp3-hello-world-prompt-chatgpt",
  "displayName": "helloworld-dp3-hello-world-prompt-chatgpt",
  "tags": [
    "example",
    "simple-example",
    "scenario-helloworld",
    "scenario-example-helloworld"
  ],
  "description": "Hello world example datapoint that sends user-provided content to a language model and returns a concise summary consisting of exactly two sentences.",
  "datapoint": {
    "type": "http",
    "http": {
      "url": "https://api.openai.com/v1/chat/completions",
      "method": "POST",
      "body": {
        "model": "gpt-5",
        "messages": [
          {
            "role": "developer",
            "content": "You are a tool to summarize content and return the summary of the user input in pure text form in exactly two sentences."
          },
          {
            "role": "user",
            "content": "${input.content}"
          }
        ]
      }
    },
    "auth": "helloworld-a1-auth-token-chatgpt"
  }
}
Mistral Datapoint
{
  "id": "helloworld-dp4-hello-world-prompt-mistral",
  "type": "datapoint",
  "version": "0.0.1",
  "name": "helloworld-dp4-hello-world-prompt-mistral",
  "displayName": "helloworld-dp4-hello-world-prompt-mistral",
  "tags": [
    "example",
    "simple-example",
    "scenario-helloworld",
    "scenario-example-helloworld"
  ],
  "description": "Hello world example datapoint that sends user-provided content to a language model and returns a concise summary consisting of exactly two sentences.",
  "datapoint": {
    "type": "http",
    "http": {
      "url": "https://api.mistral.ai/v1/chat/completions",
      "method": "POST",
      "body": {
        "model": "mistral-small-2503",
        "messages": [
          {
            "role": "developer",
            "content": "You are a tool to summarize content and return the summary of the user input in pure text form in exactly two sentences."
          },
          {
            "role": "user",
            "content": "${input.content}"
          }
        ]
      }
    },
    "auth": "helloworld-a2-auth-token-mistral"
  }
}
Now we create two Auth entries for the two different LLM implementations:
{
  "id": "helloworld-a1-auth-token-chatgpt",
  "type": "auth",
  "version": "0.0.1",
  "name": "helloworld-a1-auth-token-chatgpt",
  "displayName": "Bearer API Key Authentication for ChatGPT",
  "description": "Bearer token authentication configuration for API key-based authentication.",
  "tags": [
    "example",
    "simple-example",
    "scenario-helloworld",
    "scenario-example-helloworld"
  ],
  "auth": {
    "type": "bearer",
    "secret": {
      "key": "OpenAIKey",
      "value": "${template.token}"
    }
  },
  "uiConfig": {
    "fields": [
      {
        "key": "token",
        "label": "ChatGPT authentication token",
        "control": "password"
      }
    ]
  }
}
{
  "id": "helloworld-a2-auth-token-mistral",
  "type": "auth",
  "version": "0.0.1",
  "name": "helloworld-a2-auth-token-mistral",
  "displayName": "Bearer API Key Authentication for Mistral",
  "description": "Bearer token authentication configuration for API key-based authentication.",
  "tags": [
    "example",
    "simple-example",
    "scenario-helloworld",
    "scenario-example-helloworld"
  ],
  "auth": {
    "type": "bearer",
    "secret": {
      "key": "OpenAIKey",
      "value": "${template.token}"
    }
  },
  "uiConfig": {
    "fields": [
      {
        "key": "token",
        "label": "Mistral authentication token",
        "control": "password"
      }
    ]
  }
}
Key Considerations
- Both auth entries use template tokens (
${template.token}) as placeholders for credentials. Thetemplatenamespace is resolved once, at instantiation, and the resolved value is written into the element that the instantiation creates. - The
uiConfigblock defines how these tokens are collected during instantiation. Here the token is collected in a password field.
uiConfig field reference
| Field | Type | Required | Description |
|---|---|---|---|
fields | array | yes | The fields shown in the template editor, in order |
fields[].key | string | yes | Matches the name used in the ${template.<key>} placeholder |
fields[].label | string | — | Label shown next to the field. Defaults to the key |
fields[].control | string | — | text, password, textarea or select. Defaults to text |
control, not controlTypeA field written as "controlType": "password" is ignored and the field renders as a plain text input, so
a credential is typed in the clear. There is no validation error — check the spelling if a password field
appears as ordinary text.
Corrected in OLIVE 1.3.1. Up to and including 1.3.0 the generated OLIVE type documentation declared
this property as controlType, which is not what the template pilet reads. The type documentation now
declares control, and instantiating a template that uses microfrontends writes control as well. A
uiConfig you already authored with controlType is not broken — the property is ignored, as it always
was — but change it to control to get the control you intended.
This approach ensures that sensitive data such as credentials are not hardcoded in the datapoint definition, but instead securely provided during template instantiation.
Datapoints and Connectors
Next, we need to create the datapoint for retrieving the regulation content from a URL.
This datapoint is identical to the one used in the original Hello World example, if you have already created it during that example you won't need to re-create it.
{
  "id": "helloworld-dp1-hello-world-http-get",
  "type": "datapoint",
  "version": "0.0.1",
  "name": "helloworld-dp1-hello-world-http-get",
  "displayName": "helloworld-dp1-hello-world-http-get",
  "tags": [
    "example",
    "simple-example",
    "scenario-helloworld",
    "scenario-example-helloworld"
  ],
  "description": "Simple example datapoint that performs an HTTP GET request to a user-provided URL. Intended as a minimal \"hello world\" example for testing connectivity and request execution.",
  "datapoint": {
    "type": "http",
    "http": {
      "url": "${input.url}",
      "method": "GET"
    }
  }
}
Next, we create two connectors:
-
One that links the regulation retrieval datapoint to the ChatGPT-specific datapoint
-
{"id": "helloworld-c2-hello-world-to-summary-chatgpt","type": "connector","version": "0.0.1","name": "helloworld-c2-hello-world-to-summary-chatgpt","displayName": "helloworld-c2-hello-world-to-summary-chatgpt","tags": ["example","simple-example","scenario-helloworld","scenario-example-helloworld"],"description": "Hello world example connector that performs an HTTP GET request to a provided URL and then summarizes the response content using a summary datapoint.","connector": {"elements": [{"ref": "httpResponse","element": "helloworld-dp1-hello-world-http-get"},{"element": "helloworld-dp3-hello-world-prompt-chatgpt","parameters": {"content": "${ref.httpResponse}"}}]}}
-
-
One that links it to the Mistral-specific datapoint
-
{"id": "helloworld-c3-hello-world-to-summary-mistral","type": "connector","version": "0.0.1","name": "helloworld-c3-hello-world-to-summary-mistral","displayName": "helloworld-c3-hello-world-to-summary-mistral","tags": ["example","simple-example","scenario-helloworld","scenario-example-helloworld"],"description": "Hello world example connector that performs an HTTP GET request to a provided URL and then summarizes the response content using a summary datapoint.","connector": {"elements": [{"ref": "httpResponse","element": "helloworld-dp1-hello-world-http-get"},{"element": "helloworld-dp4-hello-world-prompt-mistral","parameters": {"content": "${ref.httpResponse}"}}]}}
-
Both connectors define the execution sequence of datapoints and handle the correct passing of parameters.
Patterns and Template
After setting up the basic connectable elements, we move on to the template-specific parts of the scenario.
-
Connectivity Patterns
-
Create one pattern for the ChatGPT connector
-
{"id": "helloworld-cp1-conn-pattern-chatgpt","type": "connectivityPattern","version": "0.0.1","name": "helloworld-cp1-conn-pattern-chatgpt","displayName": "helloworld-cp1-conn-pattern-chatgpt","tags": ["example","simple-example","scenario-helloworld","scenario-example-helloworld"],"description": "A chatgpt specified connectivity pattern for a simple Hello World example, to be referenced by a Template.","connectivityPattern": {"elements": [{"id": "helloworld-c2-hello-world-to-summary-chatgpt"}]}}
-
-
Create another pattern for the Mistral connector
-
{"id": "helloworld-cp2-conn-pattern-mistral","type": "connectivityPattern","version": "0.0.1","name": "helloworld-cp2-conn-pattern-mistral","displayName": "helloworld-cp2-conn-pattern-mistral","tags": ["example","simple-example","scenario-helloworld","scenario-example-helloworld"],"description": "A mistral specified connectivity pattern for a simple Hello World example, to be referenced by a Template.","connectivityPattern": {"elements": [{"id": "helloworld-c3-hello-world-to-summary-mistral"}]}}
-
-
-
Template
-
Add a step to the template, which includes both of the above patterns.
-
This step defines the configuration choice for the user during instantiation.
-
{"id": "helloworld-t1-llm-configurator","type": "template","version": "0.0.1","name": "helloworld-t1-llm-configurator","displayName": "helloworld-t1-llm-configurator","tags": ["example","simple-example","scenario-helloworld","scenario-example-helloworld"],"description": "A template for our Hello World example.","template": {"steps": [{"label": "LLM Configuration","description": "Configure the large language model to use for the Hello World example.","patterns": ["helloworld-cp1-conn-pattern-chatgpt","helloworld-cp2-conn-pattern-mistral"]}]}}
-
-
The key point here:
When a user instantiates the template, they select one of the available patterns.
- The chosen pattern is copied into the tenant and becomes part of the instantiated use case.
- The unselected pattern is ignored.
If desired, you may adapt small details, such as names or descriptions.
For example, the displayName of the template defines how it will appear in the template overview application.
Instantiating Templates
Once the template and all its connectable elements have been created, you can instantiate your new use case.
Steps to Instantiate
- Open the template overview application
Go to:
https://app.<tenant>.<cluster>.<domain>/?config=olive-template-dashboard
-
Select the template
You should now see the template you created (e.g. Hello World Template).-
If it does not appear, review your configuration:
- The template may have an incorrect name.
In such cases, check your template entry in the connectivity editor.
- The template may have an incorrect name.
-
-
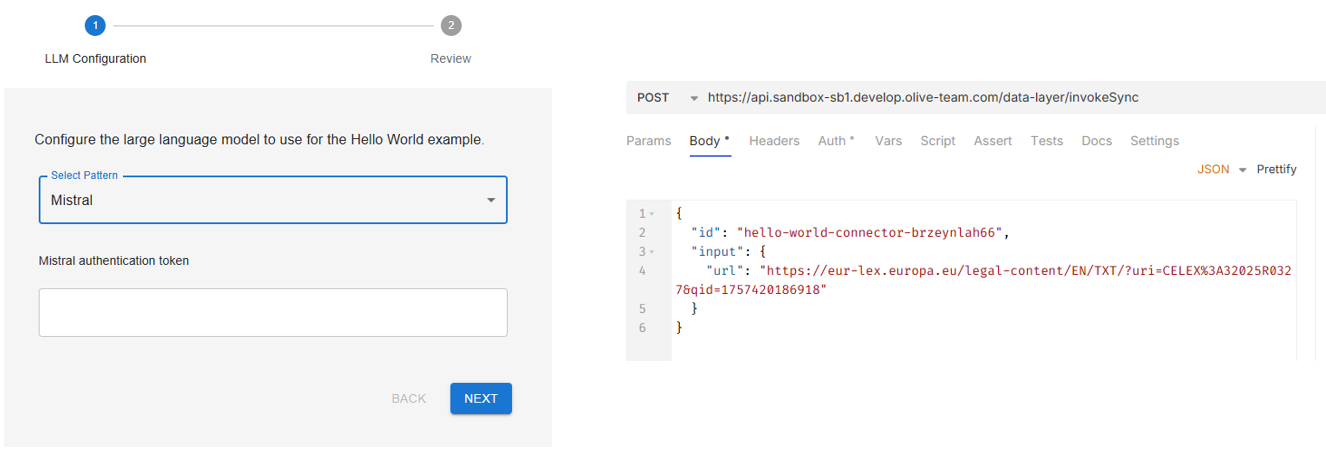
Provide configuration
-
Select your preferred Large Language Model (LLM).
-
Enter the credentials token for the selected provider.
-
Example:
- Choose Mistral if you have valid Mistral credentials.
- Otherwise, use ChatGPT and provide your OpenAI credentials.
-
-
Complete the instantiation
Once finished, the system will generate the required entries. Each new element will have a unique ID suffix. -
Test the use case
Copy the ID of the newly created connector and test it in your API tool (e.g. Bruno), just like in the original Hello World example, to confirm the instantiation was successful.
Lessons Learned
-
Template Basics
- When and why to create reusable templates.
- Key considerations for structuring templates correctly.
-
Creating and Instantiating Templates
- Steps to design, implement, and parameterize templates.
- How to instantiate templates for tenant-specific use cases.
By understanding these concepts, you can efficiently create reusable connectivity scenarios while ensuring flexibility for tenant-specific needs.